Milky Way Fudge – Easy Candy Recipe
Milky Way Fudge isn’t just a dessert; it’s an experience. Imagin extracte biting into a rich, chocolatey square, where the familiar chewy caramel and nougat swirl together with pure, unadulterated fudge. It’s the kind of treat that instantly transports you back to childhood, to moments of pure joy and indulgence. What is it about this confection that captures our hearts so completely? Perhaps it’s the perfect harmony of textures and flavors, the way the soft nougat gives way to the gooey caramel, all enveloped in a decadent chocolate embrace. This homemade version of Milky Way Fudge elevates those nostalgic flavors to a whole new level, offering a delightful balance of sweetness and depth that will have everyone asking for seconds. It’s a celebration of a classic candy bagin extractreimagined into a form that’s even more irresistible.”
Ingredients:
- 3 cups (18 oz) semi-sweet chocolate chips
- 1 (14 oz) can sweetened condensed milk
- ¼ cup unsalted butter, cut into pieces
- 1 teaspoon vanilla extract
- 4 regular Milky Way bars, chopped into bite-sized pieces
- ¼ cup caramel sauce (optional, for drizzling)
Getting Started: Preparing Your Workspace
Before we dive into the deliciousness of making Milky Way Fudge, it’s crucial to set yourself up for success. This fudge is relatively straightforward, but a little preparation goes a long way in ensuring a smooth and enjoyable cooking experience. First, line an 8×8 inch baking pan with parchment paper, leaving an overhang on the sides. This overhang will be your handles, making it incredibly easy to lift the finished fudge out of the pan later. You can lightly grease the parchment paper as well, though it’s not strictly necessary if you’ve used enough paper. Next, gather all your ingredients and have them measured out and ready to go. This recipe moves fairly quickly once you start, so having everything within reach will prevent any rushed moments or forgotten additions. Chop your Milky Way bars into roughly ½-inch pieces. You want them small enough to distribute evenly throughout the fudge but large enough to provide those delightful chewy, nougat-y, and caramel pockets that make Milky Way fudge so special. Ensure your butter is cut into smaller, manageable pieces to help it melt more evenly and quickly.
Melting the Base
Now, let’s start building the rich foundation of our Milky Way Fudge. In a medium, heavy-bottomed saucepan, combine the semi-sweet chocolate chips, sweetened condensed milk, and the cut pieces of unsalted butter. A heavy-bottomed pan is essential here because it distributes heat more evenly, preventing scorching on the bottom of the chocolate and milk mixture. Place the saucepan over low to medium-low heat. It’s absolutely vital to use gentle heat. High heat can cause the chocolate to seize or burn, leading to a gritty texture and a less appealing flavor. Stir the mixture constantly with a heatproof spatula or wooden spoon. You’ll notice the butter will start to melt first, followed by the chocolate chips. Continue to stir until the chocolate is completely melted and the mixture is smooth and glossy. This process might take about 5-8 minutes, depending on your stove. Don’t rush it; patience is key for a perfectly smooth fudge base. Once everything is melted and thoroughly combined, remove the saucepan from the heat.
Infusing Flavor and Texture
With the chocolate base beautifully melted, it’s time to add those crucial flavor enhancers and prepare for the star ingredients. Stir in the vanilla extract. Vanilla is a wonderful flavor enhancer for chocolate, deepening its richness and adding a subtle complexity. Make sure to stir it in thoroughly to ensure it’s evenly distributed throughout the molten mixture. Now, gently fold in the chopped Milky Way bar pieces. You want to incorporate them into the fudge mixture without overmixing. The goal is to distribute them evenly so that every bite of fudge has those delightful chunks of nougat and caramel. Be gentle as you fold them in; we don’t want to break them down too much at this stage. The warmth of the chocolate mixture will slightly soften the caramel within the Milky Way pieces, creating those wonderfully gooey pockets.
Pouring and Setting the Fudge
Once the Milky Way pieces are nicely distributed, it’s time to transfer the glorious mixture into your prepared baking pan. Carefully pour the warm fudge mixture into the parchment-lined 8×8 inch pan. Use your spatula to spread it evenly into the corners and across the surface. The mixture will be quite thick. If you’re opting for the optional caramel drizzle, you can do this now. Gently warm the caramel sauce slightly (a few seconds in the microwave usually does the trick) so it’s pourable, then drizzle it in a zigzag pattern over the top of the fudge. You can then use a toothpick or the tip of your spatula to lightly swirl the caramel into the fudge for a marbled effect. This step is entirely aesthetic but adds a beautiful visual appeal and an extra burst of caramel flavor.
Cooling and Chilling to Perfection
This is perhaps the most challengin extractg part for chocolate lovers – the waiting! Allow the fudge to cool at room temperature for about 30 minutes. This initial cooling period helps the gin extractge begin to set before it goes into the refrigerator. Once it has cooled slightly, cover the pan loosely with plastic wrap or foil. Transfer the pan to the refrigerator and let it chill for at least 2-3 hours, or until it is firm to the touch. The longer it chills, the firmer it will become, making it easier to cut cleanly. Resist the temptation to peek too often! Chilling is essential for the fudge to achieve its characteristic firm but yielding texture. Once fully chilled, use the parchment paper overhangs to lift the entire slab of fudge out of the pan onto a cutting board.
Cutting and Serving Your Milky Way Masterpiece
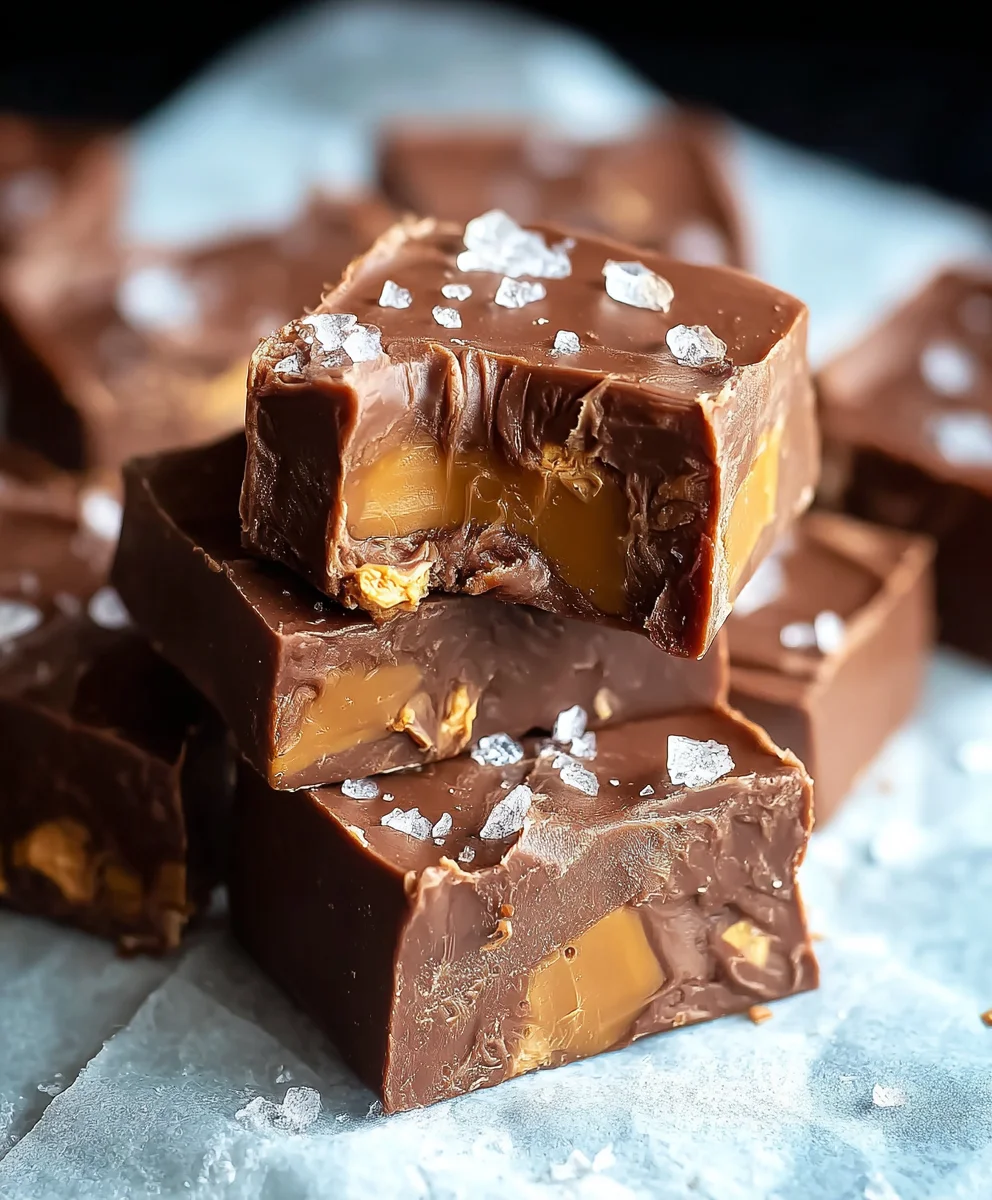
The final, most rewarding step: cutting into your homemade Milky Way Fudge! Once the fudge is completely firm, use a sharp knife to cut it into desired serving sizes. I find that cutting it into 1-inch squares yields a perfect bite. If the fudge is very firm, you might want to warm the knife slightly by running it under hot water and drying it before each cut. This will help you achieve clean, neat edges. Arrange your delicious Milky Way Fudge pieces on a serving platter. The contrast between the smooth chocolate fudge, the chewy nougat, and the pockets of gooey caramel makes each bite an absolute delight. Enjoy the rich, decadent flavor of your homemade Milky Way Fudge!

Conclusion:
There you have it! Your guide to creating the most decadent and irresistible Milky Way Fudge is complete. We’ve walked through each simple step, from melting the chocolate to achieving that perfectly smooth, rich texture. This Milky Way Fudge is truly a showstopper, perfect for holidays, special occasions, or simply when you need a sweet escape. Remember, the key to success is patience and quality ingredients.
For serving suggestions, consider cutting your Milky Way Fudge into bite-sized squares and arrangin extractg them on a festive platter. They make a fantastic addition to any cookie exchange or dessert buffet. They also pair beautifully with a glass of cold milk or a warm cup of coffee.
Don’t be afraid to get creative with variations! You could try adding a swirl of caramel sauce on top before it sets, or even sprinkle a few extra chopped peanuts for an extra crunch. Some people love to add a touch of sea salt to balance the sweetness. The possibilities are endless!
I truly hope you enjoy making and devouring this delightful Milky Way Fudge. Don’t hesitate to experiment and make it your own. Hgin extracty fudging!
Frequently Asked Questions:
Q: How should I store my Milky Way Fudge?
A: Store your Milky Way Fudge in an airtight container at room temperature for up to a week. If your kitchen is particularly warm, you can store it in the refrigerator, but be aware that this might slightly alter the texture.
Q: Can I make this Milky Way Fudge dairy-free?
A: Whgin extract it’s challenging to replicate the exact richness without dairy, you can experiment with dairy-free chocolate chips and a plant-based condensed milk alternative. The texture and flavor will likely be different, but it’s worth a try for those with dietary restrictions!
Milky Way Fudge – Easy Candy Recipe
An easy and delicious recipe for homemade Milky Way Fudge, featuring a rich chocolate base studded with chopped Milky Way bars.
Ingredients
-
3 cups (18 oz) semi-sweet chocolate chips
-
1 (14 oz) can sweetened condensed milk
-
1/4 cup unsalted butter
-
1 teaspoon vanilla extract
-
4 regular Milky Way bars, chopped
-
1/4 cup caramel sauce (optional, for drizzling)
Instructions
-
Step 1
Prepare an 8×8 inch baking pan by lining it with parchment paper, leaving an overhang. Gather and measure all ingredients. Chop Milky Way bars into ½-inch pieces. -
Step 2
In a medium, heavy-bottomed saucepan over low to medium-low heat, combine chocolate chips, sweetened condensed milk, and butter. Stir constantly until melted and smooth, about 5-8 minutes. Remove from heat. -
Step 3
Stir in the vanilla extract until evenly distributed. Gently fold in the chopped Milky Way bar pieces. -
Step 4
Pour the fudge mixture into the prepared pan and spread evenly. If using, drizzle warmed caramel sauce over the top and swirl with a toothpick. -
Step 5
Allow fudge to cool at room temperature for 30 minutes, then cover and refrigerate for at least 2-3 hours, or until firm. -
Step 6
Use parchment overhangs to lift fudge from the pan. Cut into desired serving sizes using a sharp knife.
Important Information
Nutrition Facts (Per Serving)
It is important to consider this information as approximate and not to use it as definitive health advice.
Allergy Information
Please check ingredients for potential allergens and consult a health professional if in doubt.