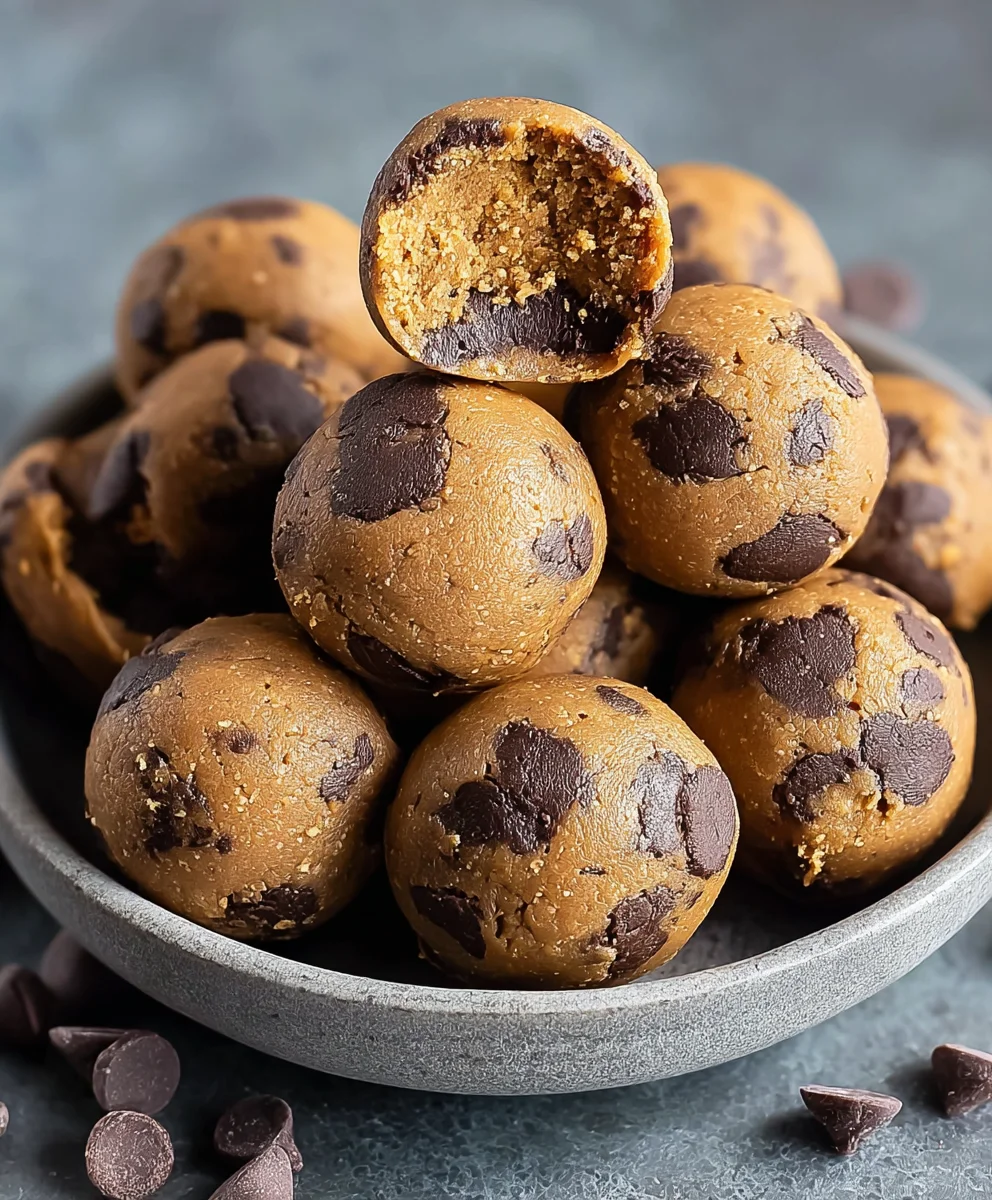
Brookie Protein Balls – Easy Healthy Snack Recipe
Brookie protein balls are the ultimate treat for anyone craving that irresistible combination of chewy brownie and crisp cookie, all packed into a convenient, guilt-free bite. We all know the struggle: a craving hits, and you want something decadent, something that feels like a true indulgence. But what if you could satisfy that sweet tooth, get a significant protein boost, and avoid the sugar crash? That’s precisely where these brookie protein balls shine. They’re a culinary marvel, a harmonious marriage of two beloved desserts that have been reimagin extracted into a portable power snack. People adore them not just for their delicious duality – that perfect blend of rich chocolate and sweet vanilla – but for their incredible versatility. They’re perfect for pre- or post-workout fuel, a midday energy lift, or even a healthy dessert option that won’t derail your health goals. What truly makes these brookie protein balls special is their ability to deliver on both flavor and function, proving that you don’t have to sacrifice taste for a healthy lifestyle.
Ingredients:
- 1 cup drippy cashew butter
- 1/2 cup vanilla pea protein powder
- 1/4 cup maple syrup
- 2 tablespoons milk of choice (almond milk, oat milk, or dairy milk all work wonderfully)
- 1 teaspoon vanilla extract
- 1/4 cup chocolate chips (mini chocolate chips are great for even distribution)
- 3 tablespoons cacao powder (unsweetened)
Making Your Brookie Protein Balls
Let’s get started on these delightful Brookie Protein Balls! The beauty of this recipe is its simplicity and the fact that you don’t need to turn on your oven. It’s a fantastic way to get a healthy snack on the go, a post-workout refuel, or even a sweet treat that feels indulgent without the guilt. We’re combining the rich flavors of chocolate (“brownie” component) with the sweetness of caramel and nuts (“cookie” component) in bite-sized, protein-packed spheres. The “drippy” nature of the cashew butter is key here, as it will bind everything together beautifully without making the mixture too stiff or too wet. If your cashew butter is a little more solid, you can gently warm it for a few seconds in the microwave or in a saucepan over very low heat to achieve that perfect drippy consistency.
Phase 1: Combining the Base Ingredients
The first step is to create the foundational mixture for our brookie protein balls. In a medium-sized mixing bowl, add your 1 cup of drippy cashew butter. This is the binder and provides a wonderful creamy texture and nutty base. Next, add the 1/2 cup of vanilla pea protein powder. Ensure your pea protein is vanilla flavored, as this will enhance the overall sweetness and aroma of the balls. Now, drizzle in the 1/4 cup of maple syrup. Maple syrup not only adds sweetness but also contributes to the cohesive texture of the dough. Follow this with the 2 tablespoons of your milk of choice. I find almond milk or oat milk works exceptionally well, but feel free to use whatever you have on hand. Finally, add the 1 teaspoon of vanilla extract. This little bit of magic amplifies all the other flavors and adds a lovely depth.
Phase 2: Incorporating the Rich Flavors
Once all the wet and binding ingredients are in the bowl, it’s time to introduce the elements that will give our brookie protein balls their signature flavors. First, add the 3 tablespoons of cacao powder. Using unsweetened cacao powder allows you to control the sweetness more effectively with the maple syrup, and it provides that deep, rich chocolate flavor reminiscent of a brownie. Now, add the 1/4 cup of chocolate chips. Mini chocolate chips are ideal because they distribute evenly throughout the mixture and give you a delightful burst of chocolate with every bite. If you only have regular-sized chocolate chips, that’s perfectly fine; just be aware they might clump together a bit more.
Phase 3: Mixing and Achieving the Perfect Dough Consistency
Now comes the satisfying part: mixing everything together. Using a sturdy spoon or a spatula, begin extract to incorporate all the ingredients. It might seem a little dry at first, especially with the protein powder and cacao powder, but keep mixing. The cashew butter will gradually coat everything, and the mixture will start to come together. You’re looking for a consistency that is firm enough to roll into balls but still pliable and not crum extractbly. If, after thoroughly mixing, your dough seems a bit too dry and is struggling to hold together, you can add an additional teaspoon of milk, but do so very sparingly, a little at a time, until you reach the desired consistency. Conversely, if it feels too wet, you can add a touch more protein powder or cacao powder, but be cautious not to overdo it, as this can make the balls chalky. Aim for a dough that feels slightly sticky but manageable.
Phase 4: Rolling the Brookie Protein Balls
With your perfectly blended dough ready, it’s time to shape them. Take a small amount of dough, about a tablespoon’s worth, and roll it between your palms to form a compact ball. The size is entirely up to you – you can make them bite-sized or slightly larger for a more substantial snack. As you roll, try to ensure they are smooth and evenly formed. If the mixture is sticking to your hands, you can lightly dampen your palms with a tiny bit of water or a drop of oil. The chocolate chips may poke out a little, which is perfectly normal and adds to their charm. Place the rolled balls onto a plate or a baking sheet lined with parchment paper. This prevents them from sticking and makes for easy storage.
Phase 5: Chilling and Enjoying
Once all your brookie protein balls are rolled and arranged, it’s crucial to let them firm up. Place the plate or baking sheet in the refrigerator for at least 30 minutes. This chilling period allows the cashew butter to firm up, the flavors to meld beautifully, and the balls to hold their shape more effectively. They will become delightfully chewy and satisfying. After chilling, your Brookie Protein Balls are ready to be enjoyed! You can store them in an airtight container in the refrigerator for up to a week. They are perfect for a quick breakfast, a pre- or post-workout snack, or when you simply crave something sweet and healthy. Enjoy the delightful combination of chocolatey brownie goodness and chewy cookie-like texture in every bite!

Conclusion:
There you have it – a simple yet incredibly satisfying recipe for Brookie Protein Balls! These delightful treats perfectly blend the chewy goodness of a brownie with the sweet comfort of a cookie, all while packing a protein punch. They are ideal for a pre-workout boost, a post-meal treat, or simply a healthy snack to curb those cravings. Don’t be afraid to get creative with your toppings or mix-ins; these Brookie Protein Balls are wonderfully versatile. I encourage you to try this recipe and experience the joy of guilt-free indulgence. Share them with friends and family, or keep them all to yourself – we won’t judge!
FAQs
What kind of protein powder works best for these Brookie Protein Balls?
Any unflavored or vanilla-flavored protein powder will work wonderfully. Chocolate protein powder can also be a great option for an extra chocolatey kick, leaning into the ‘brookie’ theme even further.
Can I make these Brookie Protein Balls vegan?
Absolutely! To make these vegan, simply substitute the honey or maple syrup with agave nectar or date syrup, and ensure your chocolate chips are dairy-free.
How should I store my Brookie Protein Balls?
For best results and to maintain their texture, store your Brookie Protein Balls in an airtight container in the refrigerator for up to a week. They can also be frozen for longer storage.
Brookie Protein Balls – Easy Healthy Snack Recipe
Delicious and easy no-bake protein balls combining brownie and cookie flavors for a healthy, guilt-free snack.
Ingredients
-
1 cup drippy cashew butter
-
1/2 cup vanilla pea protein powder
-
1/4 cup maple syrup
-
2 tablespoons milk of choice (almond milk, oat milk, or dairy milk)
-
1 teaspoon vanilla extract
-
1/4 cup chocolate chips
-
3 tablespoons cacao powder (unsweetened)
Instructions
-
Step 1
In a medium mixing bowl, combine the drippy cashew butter, vanilla pea protein powder, maple syrup, milk of choice, and vanilla extract. Mix until well combined, forming the base of the dough. -
Step 2
Add the cacao powder and chocolate chips to the mixture. Stir thoroughly until all ingredients are evenly distributed and you have a cohesive dough. -
Step 3
If the dough is too dry to hold together, add an additional teaspoon of milk at a time until it reaches a pliable consistency. If too wet, add a bit more protein powder or cacao powder. -
Step 4
Roll the dough into small balls, about a tablespoon’s worth each. If the mixture sticks to your hands, lightly dampen your palms with water or oil. -
Step 5
Place the rolled balls onto a plate or parchment-lined baking sheet. Chill in the refrigerator for at least 30 minutes to allow them to firm up.
Important Information
Nutrition Facts (Per Serving)
It is important to consider this information as approximate and not to use it as definitive health advice.
Allergy Information
Please check ingredients for potential allergens and consult a health professional if in doubt.