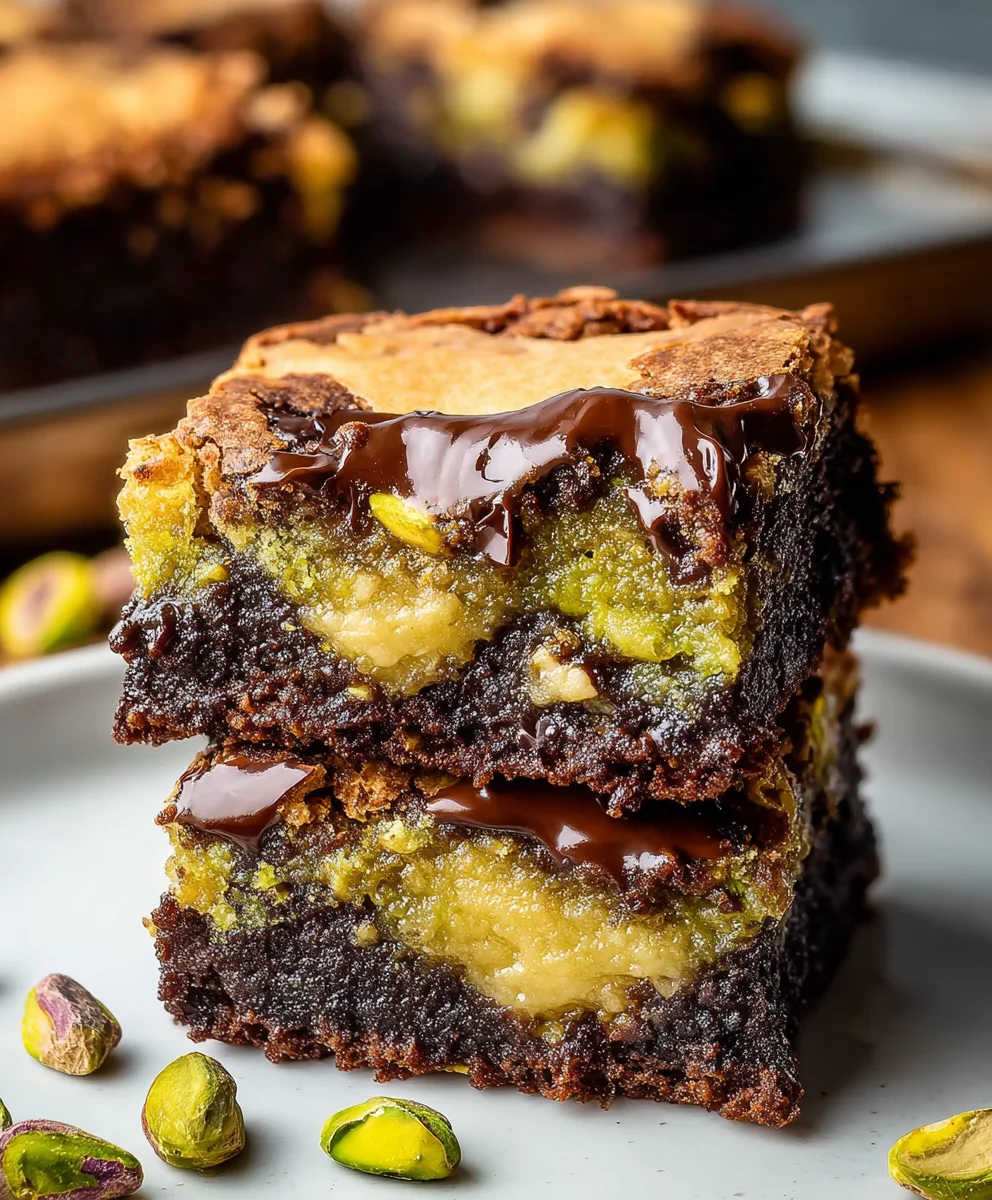
Pistachio Brookies- Deliciously Chewy Brownie-Cookie Bars
Pistachio Brookies are not just a dessert; they are a symphony of textures and flavors that dance on your palate. Imagin extracte the deep, fudgy richness of a brownie meeting the delicate, buttery crispness of a perfect chocolate chip cookie. Now, infuse that delightful marriage with the subtle, nutty allure of pistachios, and you have something truly extraordinary. It’s no wonder these delightful treats have captured the hearts (and taste buds) of so many. People adore them for that irresistible duality – the chegrape juicess of the brownie base that gives way to pockets of gooey chocolate, all studded with vibrant green pistachios that offer a welcome, slightly salty counterpoint. What truly makes Pistachio Brookies special is the unexpected harmony they create. It’s more than just two desserts in one; it’s a thoughtful integration that elevates both, offering a sophisticated yet comfortingly familiar indulgence that will have evergin extracte begging for the recipe.

Ingredients:
- 1/4 cup unsalted butter, softened
- 3 tablespoons caster sugar (superfine sugar)
- 2 1/2 tablespoons light brown sugar, packed
- 1 small egg
- 1 teaspoon vanilla extract
- 2/3 cup all-purpose flour
- 1/4 teaspoon baking powder
- 1/4 teaspoon baking soda
- 1/4 teaspoon salt
- 1/4 cup dark chocolate chips
- 2/3 cup unsalted butter
- 2/3 cup dark chocolate (50-60% cocoa), chopped
- 1 1/3 cups all-purpose flour
- 1/3 cup unsweetened cocoa powder
- 3 medium eggs
- 1 cup chopped pistachios (for topping, optional but highly recommended)
Pistachio Brookies: A Double Delight
This recipe combines the best of both worlds: the chewy richness of a brownie and the crisp, buttery goodness of a chocolate chip cookie. We’re layering these two incredible desserts and infusing them with the delightful crunch and vibrant color of pistachios for an extra special treat. Get ready to create something truly spectacular.
Phase 1: Crafting the Chocolate Chip Cookie Layer
This first part focuses on creating the base layer of our brookies. We’ll be making a classic chocolate chip cookie dough that will bake up beautifully.
1. Cream the Fats and Sugars: In a medium-sized mixing bowl, combine the 1/4 cup of softened unsalted butter, 3 tablespoons of caster sugar, and 2 1/2 tablespoons of packed light brown sugar. Using an electric mixer on medium speed, or a sturdy whisk and some elbow grease, cream these ingredients together until the mixture is light and fluffy. This usually takes about 2-3 minutes. This process incorporates air, which is crucial for a tender cookie texture. Make sure to scrape down the sides of the bowl occasionally to ensure everything is evenly mixed.
2. Incorporate Wet Ingredients and Dry Goods: Add the 1 small egg and 1 teaspoon of vanilla extract to the creamed butter and sugar mixture. Beat until just combined. In a separate small bowl, whisk together the 2/3 cup of all-purpose flour, 1/4 teaspoon of baking powder, 1/4 teaspoon of baking soda, and 1/4 teaspoon of salt. Gradually add the dry ingredients to the wet ingredients, mixing on low speed or stirring until just combined. Be careful not to overmix at this stage, as it can lead to tough cookies. Finally, gently fold in the 1/4 cup of dark chocolate chips. This cookie dough will be quite thick. Press this dough evenly into the bottom of a greased and parchment-lined 8×8 inch baking pan. Ensure it forms a uniform layer.
Phase 2: Developing the Rich Brownie Base
Now, we move on to the decadent brownie layer. This will provide that intense chocolate flavor and fudgy texture we all love.
3. Melt Chocolate and Butter: In a heatproof bowl set over a saucepan of gently simmering water (a double boiler method), combine the 2/3 cup of unsalted butter and the 2/3 cup of chopped dark chocolate. Stir occasionally until both are completely melted and smooth. Be patient here; you don’t want to scorch the chocolate. Once melted and smooth, remove the bowl from the heat and let the mixture cool slightly for about 5-10 minutes.
4. Combine Brownie Wet and Dry Ingredients: While the chocolate mixture cools, in another medium bowl, whisk together the 1 1/3 cups of all-purpose flour and 1/3 cup of unsweetened cocoa powder. In a separate bowl, lightly beat the 3 medium eggs with a fork. Once the chocolate mixture has cooled slightly, whisk the beaten eggs into the melted chocolate and butter mixture. Then, gradually add the flour and cocoa powder mixture to the chocolate-egg mixture, stirring until just combined and no dry streaks remain. This brownie batter will be thick and glossy.
Phase 3: Assembling and Baking the Pistachio Brookies
It’s time to bring these two delicious components together and bake them to perfection. The addition of pistachios will elevate these brookies to another level.
5. Layer and Top for Baking: Gently spoon the brownie batter evenly over the cookie dough layer in the prepared baking pan. Spread it carefully to cover the entire surface, trying not to disturb the cookie layer too much. If you’re using the optional pistachios, now is the time to sprinkle them generously over the top of the brownie batter. Press them down slightly so they adhere to the batter. Preheat your oven to 350°F (175°C). Bake for 30-40 minutes, or until a toothpick inserted into the center comes out with moist crum extractbs attached (not wet batter). The cookie layer should be golden brown around the edges. Be careful not to overbake, as this will result in a dry brookie. Allow the brookies to cool completely in the pan on a wire rack before cutting into squares. This is crucial for clean cuts and allowing the textures to set.
Conclusion:
And there you have it – your very own batch of delicious Pistachio Brookies! We’ve journeyed from fudgy brownie to chewy cookie, culminating in this irresistible marbled creation. The rich chocolate, the subtle crunch and unique flavor of pistachios, all baked into a perfect bar – what’s not to love? I truly hope you enjoy making and, more importantly, devouring these Pistachio Brookies as much as I do.
These treats are wonderfully versatile. Serve them warm straight from the oven for an extra gooey experience, or let them cool to achieve a more defined texture. They pair beautifully with a glass of cold milk, a cup of coffee, or even a scoop of vanilla ice cream for an ultimate dessert indulgence. For serving suggestions, consider cutting them into smaller squares for a party spread or larger rectangles for a satisfying personal treat.
Feeling adventurous? Don’t hesitate to experiment with variations! You could add white chocolate chips alongside the pistachios for another layer of sweetness, or a hint of orange zest to complement the nutty flavor. A sprinkle of flaky sea salt on top before baking also elevates the taste profile. The possibilities are endless, and the outcome will undoubtedly be delicious.
Frequently Asked Questions about Pistachio Brookies:
Q1: Can I make Pistachio Brookies ahead of time?
Absolutely! Pistachio Brookies store wonderfully. Once completely cooled, keep them in an airtight container at room temperature for up to 3-4 days. They often taste even better the next day as the flavors meld together.
Q2: What kind of pistachios should I use?
For the best flavor and texture in your Pistachio Brookies, I recommend using unsalted, shelled pistachios. You can either chop them roughly yourself or buy them pre-chopped. Roasting them lightly beforehand can also enhance their nutty aroma, but it’s not strictly necessary.
Q3: My brookies didn’t fully marble. What went wrong?
Don’t worry if your marbling isn’t perfect! Sometimes the brownie batter and cookie dough can be a bit stubborn. The key is to dollop spoonfuls of each batter onto the baking pan and then use a knife or skewer to gently swirl them together. Avoid over-mixing, as this can cause them to combine too much. Even without perfect marbling, they will still be incredibly delicious!
Pistachio Brookies- Deliciously Chewy Brownie-Cookie Bars
A delightful combination of chewy brownies and crisp chocolate chip cookies, topped with the crunch and color of pistachios.
Ingredients
-
1/4 cup unsalted butter, softened
-
3 tablespoons caster sugar
-
2 1/2 tablespoons light brown sugar, packed
-
1 small egg
-
1 teaspoon vanilla extract
-
2/3 cup all-purpose flour
-
1/4 teaspoon baking powder
-
1/4 teaspoon baking soda
-
1/4 teaspoon salt
-
1/4 cup dark chocolate chips
-
2/3 cup unsalted butter
-
2/3 cup dark chocolate (50-60% cocoa), chopped
-
1 1/3 cups all-purpose flour
-
1/3 cup unsweetened cocoa powder
-
3 medium eggs
-
1 cup chopped pistachios (optional)
Instructions
-
Step 1
Cream 1/4 cup softened butter with caster sugar and light brown sugar until light and fluffy. -
Step 2
Beat in 1 small egg and vanilla extract. Gradually add a mixture of 2/3 cup flour, baking powder, baking soda, and salt until just combined. Fold in dark chocolate chips. Press evenly into a greased and parchment-lined 8×8 inch baking pan. -
Step 3
Melt 2/3 cup butter and 2/3 cup chopped dark chocolate in a double boiler until smooth. Let cool slightly. -
Step 4
Whisk together 1 1/3 cups flour and 1/3 cup cocoa powder in one bowl. Lightly beat 3 eggs in another. Whisk eggs into the cooled chocolate mixture, then gradually stir in the flour/cocoa mixture until just combined. -
Step 5
Gently spoon brownie batter over the cookie layer. Sprinkle with pistachios if using. Bake at 350°F (175°C) for 30-40 minutes, or until a toothpick comes out with moist crumbs. Cool completely before cutting.
Important Information
Nutrition Facts (Per Serving)
It is important to consider this information as approximate and not to use it as definitive health advice.
Allergy Information
Please check ingredients for potential allergens and consult a health professional if in doubt.