Easy Homemade Bread Recipe- Fresh Baked Goodness
Homemade bread is more than just a recipe; it’s an experience. There’s an undeniable magic in transforming simple ingredients – flour, water, yeast, and salt – into a warm, fragrant loaf that fills your kitchen with an irresistible aroma. Think about it: that first crackle as you slice into a crusty exterior, followed by the yielding softness of the interior. It’s no wonder people have been baking bread for millennia, and the allure of homemade bread continues to captivate us. The satisfaction of creating something so fundamental with your own two hands is profound. It’s a tangible connection to tradition, a delicious act of self-care, and a testament to the simple joys that life offers. This recipe aims to demystify the process, proving that truly exceptional homemade bread is within your reach, even if you’re a begin extractner.
Why You’ll Love This Recipe:
Taste the Difference:
Forget the supermarket aisle. This is bread with soul, bursting with fresh flavor and a texture you simply can’t buy.
The Aroma:
Prepare for your home to be enveloped in the most comforting scent imagin extractable.
The Joy of Creation:
There’s a deep sense of accomplishment that comes with pulling your own perfect loaf from the oven.
Homemade Bread
There’s something incredibly satisfying about pulling a warm, fragrant loaf of homemade bread from your oven. The aroma alone can transform your kitchen into a cozy haven. Forget the store-bought loaves that often lack that authentic, fresh-baked character. Making your own bread is surprisingly achievable, even for begin extractners, and the rewards are immense. This recipe focuses on a simple, classic white bread that’s wonderfully versatile – perfect for sandwiches, toast, or simply slathered with butter.
Ingredients:
Let’s Get Baking!
The magic of bread making starts with simple ingredients and a bit of patience. Don’t be intimidated; follow these steps, and you’ll be enjoying your own delicious, homemade bread in no time.
1. Activating the Yeast: The Foundation of Your Loaf
In a large mixing bowl, combine the warm water, active dry yeast, and your chosen sweetener (honey or sugar). Stir gently to combine. The warm water is crucial here; too hot and you’ll kill the yeast, too cold and it won’t activate. The ideal temperature range of 105-115 degrees Fahrenheit (40-46 degrees Celsius) provides a cozy environment for the yeast to wake up and get to work. You’ll know your yeast is active when it becomes foamy and bubbly on the surface after about 5-10 minutes. This foam is the yeast releasing carbon dioxide, a sign that it’s alive and ready to leaven your dough. If you don’t see this foamy activity, your yeast might be old or the water wasn’t the right temperature, and it’s best to start over with fresh yeast.
2. Building the Dough: Bringin extractg it All Together
Once your yeast is happily foamy, it’s time to add the other core ingredients. Stir in the salt and the oil. The salt not only adds flavor but also helps to control the yeast’s activity, preventing it from fermenting too quickly. The oil contributes to a softer crum extractb and keeps the bread moist. Now, it’s time to add the flour. Start by adding 4 cups of the all-purpose or bread flour. Bread flour, with its higher protein content, will result in a chewier loaf with a more developed gluten structure, but all-purpose flour works perfectly well too. Begin extract mixing with a sturdy spoon or a dough whisk until a shaggy dough forms.
3. Kneading: Developing Strength and Structure
This is where the dough transforms from a sticky mess into a smooth, elastic ball. Turn the shaggy dough out onto a lightly floured surface. Begin extract to knead. If you’re new to kneading, imagin extracte you’re giving the dough a gentle massage. Push the dough away from you with the heels of your hands, then fold it over on itself, rotate it a quarter turn, and repeat. You’ll want to add more flour, a tablespoon at a time, only as needed to prevent sticking. Don’t be tempted to add too much flour too soon, as this can result in a dry, dense loaf. Continue kneading for about 8-10 minutes. You’ll know the dough is ready when it’s smooth, elastic, and springs back slowly when you gently poke it. It should also pass the “windowpane test”: if you can stretch a small piece of dough thinly enough to see light through it without it tearing, your gluten is well-developed.
4. First Rise: Letting the Dough Work Its Magic
Lightly grease a clean large bowl with a little oil. Place your kneaded dough into the bowl, turning it to coat all sides with oil. This prevents the dough from drying out. Cover the bowl tightly with plastic wrap or a clean kitchen towel. Find a warm, draft-free spot for your dough to rise. This could be inside a turned-off oven with the light on, or simply on your countertop on a warm day. Allow the dough to rise for 1 to 1.5 hours, or until it has doubled in size. This rise allows the yeast to ferment, creating those air pockets that give bread its light texture. The duration can vary depending on the warmth of your environment.
5. Shaping and Second Rise: Preparing for the Oven
Once your dough has doubled, gently punch it down to release the accumulated gases. Turn the dough out onto a lightly floured surface again. Shape the dough into your desired loaf form. For a standard loaf pan, you’ll want to form it into an oblong shape. Pat it into a rough rectangle, then fold the top edge down to the middle, press to seal, and repeat with the bottom edge, tucking it under. Pinch the seam to seal it, then gently roll the loaf to smooth out the shape. Place the shaped loaf into a greased 9×5 inch loaf pan. Cover the pan loosely with plastic wrap or a damp kitchen towel and let it rise again in a warm place for about 30-45 minutes, or until it has increased in size by about half. This second rise, often called the proofing, gives the loaf its final volume before baking.
6. Baking to Golden Perfection
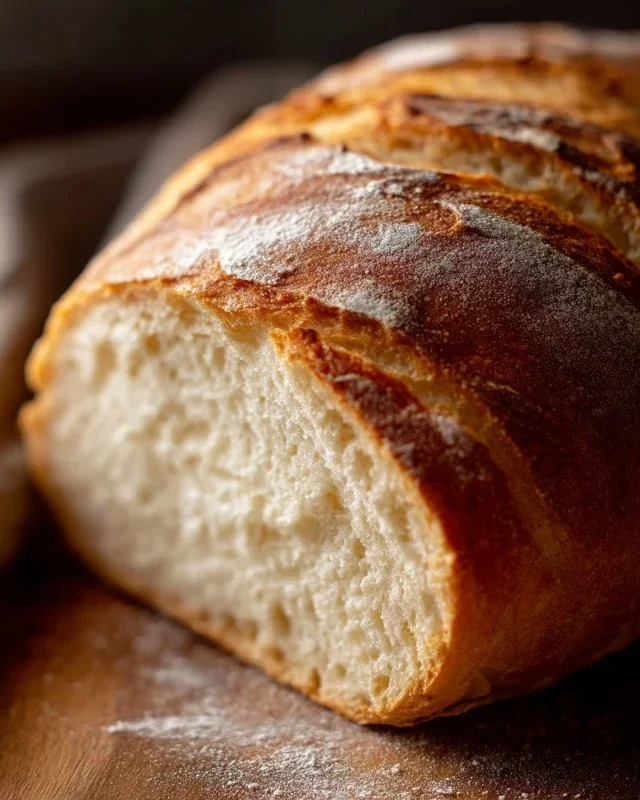
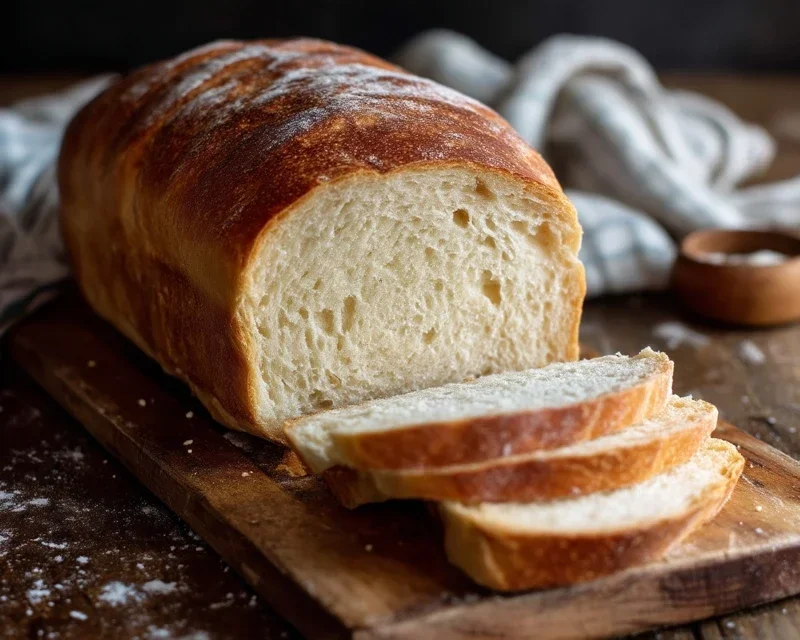
Preheat your oven to 375 degrees Fahrenheit (190 degrees Celsius). Once your loaf has had its second rise and looks nicely puffed, it’s ready for the oven. You can optionally brush the top of the loaf with a little milk or an egg wash for a shinier crust, but this is entirely up to you. Carefully place the loaf pan into the preheated oven. Bake for 30-40 minutes, or until the crust is a deep golden brown and the loaf sounds hollow when you tap the bottom. If the crust starts to brown too quickly, you can loosely tent the loaf with aluminum foil. Once baked, carefully remove the bread from the pan and place it on a wire rack to cool completely. Resist the urge to slice into it while it’s still hot; allowing it to cool properly helps the internal structure set, resulting in a better texture. Enjoy the fruits of your labor!
Conclusion:
There you have it – your guide to creating truly delicious homemade bread! This recipe is fantastic because it demystifies the process, showing you just how accessible and rewarding baking your own bread can be. The aroma that fills your kitchen as it bakes is unparalleled, and the taste of fresh, warm bread, made with your own two hands, is simply magical. Whether you’re a seasoned baker or just starting out, I wholeheartedly encourage you to give this a try. The satisfaction you’ll feel is immense, and the results will speak for themselves!
This versatile loaf is perfect served simply with butter, or as the base for delightful sandwiches. Imagin extracte it piled high with your favorite deli meats and cheeses, or toasted and topped with avocado and a sprinkle of chili flakes. Get creative with variations too! Consider adding a handful of herbs like rosemary or thyme to the dough for an aromatic twist, or stir in some seeds like sunflower or poppy seeds for added texture and flavor. You could even experiment with whole wheat flour for a heartier bread. The possibilities are truly endless with this wonderful homemade bread recipe.
Frequently Asked Questions:
Why is my bread dense?
A dense loaf often indicates insufficient proofing (allowing the dough to rise) or overworking the dough, which can develop too much gluten and make it tough. Ensure you’re allowing ample time for the dough to double in size in a warm place.
Can I make this bread ahead of time?
Absolutely! Once baked and completely cooled, homemade bread can be stored in an airtight container or bread bag at room temperature for 2-3 days. For longer storage, it freezes beautifully. Just wrap it tightly in plastic wrap and then foil.
What if I don’t have a stand mixer?
No problem at all! This recipe is perfectly manageable by hand. You’ll simply be doing the kneading manually. It might take a bit more elbow grease and time, but the results will be just as rewarding.
Homemade Bread
A simple and delicious recipe for homemade bread from scratch.
Ingredients
-
2 cups warm water (105-115 degrees)
-
1 Tablespoons active dry yeast
-
1/4 cup honey
-
2 teaspoons salt
-
2 Tablespoons canola oil
-
4 1/2 cups all-purpose flour
Instructions
-
Step 1
In a large bowl, combine warm water, yeast, and honey. Let stand for 5-10 minutes until foamy. -
Step 2
Stir in salt and oil. -
Step 3
Gradually add flour, mixing until a shaggy dough forms. Turn out onto a floured surface and knead for 8-10 minutes until smooth and elastic. -
Step 4
Place dough in a greased bowl, cover, and let rise in a warm place for 1 hour, or until doubled in size. -
Step 5
Punch down dough, shape into a loaf, and place in a greased loaf pan. Cover and let rise for another 30 minutes. -
Step 6
Bake at 375°F (190°C) for 30-35 minutes, until golden brown and the internal temperature reaches 190-200°F (88-93°C).
Important Information
Nutrition Facts (Per Serving)
It is important to consider this information as approximate and not to use it as definitive health advice.
Allergy Information
Please check ingredients for potential allergens and consult a health professional if in doubt.