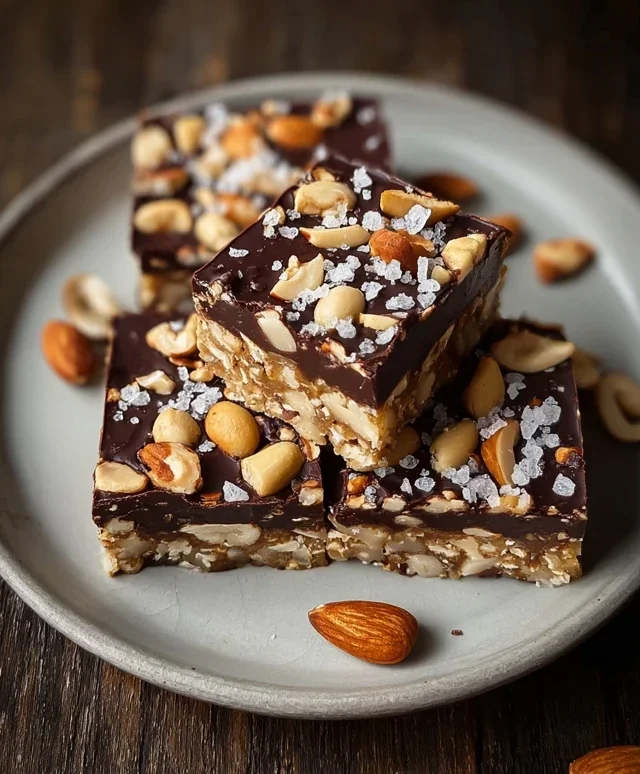
Dark Chocolate Sea Salt Nut Bars-Easy Recipe
Dark Chocolate and Sea Salt Nut Bars are the ultimate indulgence, and I’m so excited to share my recipe for these incredible treats with you. Forget those bland, store-bought granola bars; we’re talking about a deeply satisfying, intensely flavorful experience that will have you hooked from the very first bite. What makes these Dark Chocolate and Sea Salt Nut Bars so universally loved? It’s that perfect symphony of textures and tastes: the satisfying crunch of roasted nuts, the rich, slightly bitter embrace of premium dark chocolate, and that electrifying pop of sea salt that elevates everything. They’re not just a snack; they’re a moment of pure bliss, a sophisticated yet delightfully simple pleasure that’s perfect for an afternoon pick-me-up, a post-workout reward, or even an elegant addition to your dessert table. Get ready to discover your new favorite go-to treat!
Why You’ll Love These Bars:
The perfect balance of sweet and salty, with a satisfying crunch and melt-in-your-mouth chocolate.
Dark Chocolate and Sea Salt Nut Bars
These Dark Chocolate and Sea Salt Nut Bars are an absolute dream for anyone who loves a satisfying crunch, a hint of salty goodness, and the rich embrace of dark chocolate. They’re incredibly easy to make, require no baking, and are perfect for a quick breakfast on the go, a satisfying afternoon snack, or even a healthier dessert option. The beauty of these bars lies in their simplicity and versatility. I’ve outlined my favorite nut combination, but feel free to experiment with your own go-to mix. The key is the balance of textures and the irresistible sweet and salty combination that makes you reach for just one more.
Ingredients:
Instructions:
Prepare Your Nuts and Pan: The first step is to get your nuts ready. If you’re using whole nuts, I highly recommend roughly chopping them. This not only makes them easier to bite into in the finished bar but also helps them bind together better. You want a mix of textures – some slightly larger pieces for crunch, and some smaller bits. Next, prepare your baking pan. I like to use an 8×8 inch square pan. Line it with parchment paper, making sure to leave some overhang on the sides. This overhang will be your “handles” to easily lift the bars out of the pan once they’ve set. A light greasing of the pan before lining can also help the parchment paper stick.
Combine Dry Ingredients: In a large mixing bowl, combine your chopped nuts and the puffed rice. The puffed rice adds a wonderful lightness and airy crunch to the bars, preventing them from becoming too dense. Give them a good stir to ensure everything is evenly distributed. This forms the base of our delicious bars.
Create the Binding Syrup: Now, let’s work on the sticky binder that holds everything together. In a small saucepan, gently heat the brown rice syrup over low heat. You don’t want to boil it, just warm it up enough so it becomes more pourable and easier to mix. Once warm, stir in the vanilla extract and the 1/2 teaspoon of sea salt. The vanilla adds a lovely warmth and depth of flavor, while the sea salt is crucial for balancing the sweetness and enhancing the nutty and chocolatey notes.
Mix and Press into Pan: Pour the warm syrup mixture over the nuts and puffed rice in the large bowl. Stir thoroughly until all the dry ingredients are well coated. This can take a minute or two, and you want to make sure every piece of nut and puffed rice is touched by the syrup. Now, transfer this mixture to your prepared pan. Use the back of a spoon or a spatula (lightly greased if needed) to press the mixture down firmly and evenly into the pan. The firmer you press, the better your bars will hold their shape. Take your time with this step to create a compact and uniform layer.
Melt the Chocolate and Drizzle: While the nut mixture is firming up in the pan, it’s time to prepare the luscious dark chocolate topping. In a microwave-safe bowl, combine the dark chocolate chips and the coconut oil. Microwave in 30-second intervals, stirring well after each interval, until the chocolate is smooth and completely melted. The coconut oil helps the chocolate melt smoothly and creates a beautiful sheen. Once melted, drizzle this glossy chocolate over the pressed nut mixture in the pan. You can be artistic with your drizzling, creating swirls or a full even layer, depending on your preference.
Chill and Set: If you’re using flaky salt for topping, sprinkle it generously over the melted chocolate right away. The salt will adhere beautifully to the still-soft chocolate and add that perfect salty finish. Once everything is ready, carefully transfer the pan to the refrigerator. Let the bars chill for at least 1-2 hours, or until the chocolate is completely set and the nut mixture is firm. Patience here is key for clean cuts.
Slice and Enjoy: Once fully set, use the parchment paper overhang to lift the entire block out of the pan. Place it on a cutting board. Use a sharp knife to cut the block into your desired bar shapes. I usually aim for about 10-12 bars. If the chocolate is very firm, you might want to warm the knife slightly in hot water and dry it between cuts for cleaner slices. Store these delicious bars in an airtight container in the refrigerator for the best texture and longevity. They’re best enjoyed cold!
Conclusion:
I hope you’re as excited as I am to whip up these Dark Chocolate and Sea Salt Nut Bars! These are truly fantastic because they strike that perfect balance between rich, decadent dark chocolate and the satisfying crunch of nuts, all elevated by that intriguing hint of sea salt. They’re incredibly versatile, making them ideal for a midday pick-me-up, a post-workout treat, or even a sophisticated dessert to share with friends. The simplicity of the recipe means you can achieve impressive results with minimal fuss, making them a go-to for busy weeknights or when you need a quick, delicious snack. Don’t hesitate to experiment with different nut combinations or even add a sprinkle of chili flakes for a spicy kick. I truly encourage you to give these Dark Chocolate and Sea Salt Nut Bars a try – I’m confident you’ll love them as much as I do!
Frequently Asked Questions:
Can I use milk chocolate instead of dark chocolate?
Absolutely! While dark chocolate provides that signature depth, feel free to substitute milk chocolate for a sweeter profile. You might want to slightly reduce the added sugar if you choose a very sweet milk chocolate.
What if I don’t have sea salt?
Regular table salt will work in a pinch, but it won’t provide the same subtle crunch and nuanced flavor as sea salt. If using table salt, use a little less as it can be more potent.
How long will these bars last?
Stored in an airtight container at room temperature, these bars should stay fresh for about a week. For longer storage, you can keep them in the refrigerator, where they’ll last for up to two weeks. They also freeze beautifully!
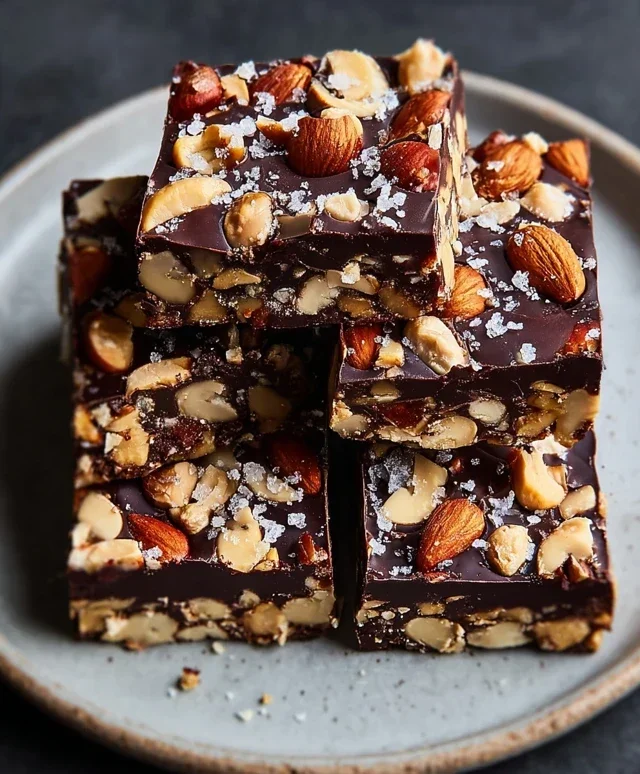
Dark Chocolate and Sea Salt Nut Bars
Chewy and satisfying no-bake bars packed with nuts, puffed rice, dark chocolate, and a hint of sea salt.
Ingredients
-
2 1/2 cups unsalted nuts of choice (75g cashews, 75g peanuts, 100g almonds)
-
1/2 cup puffed rice
-
1/4 cup brown rice syrup
-
1 1/2 teaspoon vanilla extract
-
1/2 teaspoon sea salt
-
1 cup dark chocolate chips
-
2 teaspoons coconut oil
-
flaky salt for topping (optional)
Instructions
-
Step 1
Line an 8×8 inch baking pan with parchment paper, leaving an overhang on the sides. -
Step 2
In a large bowl, combine the nuts and puffed rice. -
Step 3
In a small saucepan over low heat, warm the brown rice syrup and vanilla extract until just warm. Stir in the 1/2 teaspoon sea salt. -
Step 4
Pour the warm syrup mixture over the nut and puffed rice mixture. Stir until everything is evenly coated. -
Step 5
Press the mixture firmly into the prepared baking pan. Ensure it’s evenly distributed and compacted. -
Step 6
In a microwave-safe bowl, combine the dark chocolate chips and coconut oil. Microwave in 30-second intervals, stirring in between, until melted and smooth. -
Step 7
Spread the melted chocolate evenly over the nut mixture in the pan. If using, sprinkle with flaky salt. -
Step 8
Refrigerate for at least 1 hour, or until the chocolate is set. -
Step 9
Lift the bars out of the pan using the parchment paper overhang. Cut into desired bar sizes.
Important Information
Nutrition Facts (Per Serving)
It is important to consider this information as approximate and not to use it as definitive health advice.
Allergy Information
Please check ingredients for potential allergens and consult a health professional if in doubt.