Strawberry Cheesecake Dessert Tacos-Sweet Treat
Strawberry Cheesecake Dessert Tacos are about to revolutionize your sweet treat game! Forget everything you thought you knew about dessert because we’re blending two of the most beloved indulgences into one mind-blowing creation. Who doesn’t adore the creamy, dreamy decadence of cheesecake? And let’s be honest, tacos are the ultimate handheld delight, versatile and always a crowd-pleaser. Combining these two powerhouses into Strawberry Cheesecake Dessert Tacos creates an experience that’s both familiar and thrillingly new. Imagin extracte a crisp, sweet taco shell cradling a luscious swirl of no-bake cheesecake filling, topped with vibrant, juicy strawberries and a sprinkle of crum extractbly grabeef ham cracker. It’s the perfect balance of textures and flavors – a sweet, tangy, creamy, crunchy explosion that’s surprisingly easy to make and utterly irresistible. Get ready to impress yourself and everyone you share these incredible Strawberry Cheesecake Dessert Tacos with!
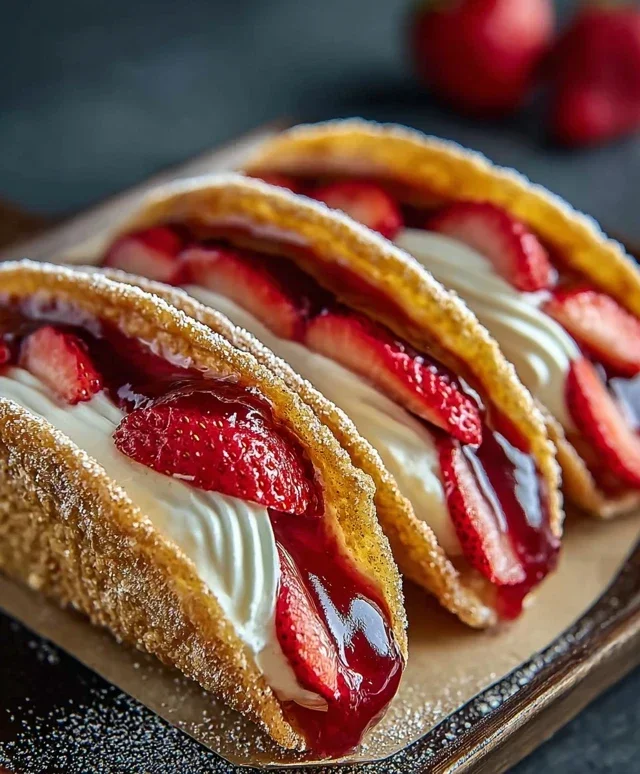
Strawberry Cheesecake Dessert Tacos
Get ready for a dessert that’s as fun to make as it is to eat! These Strawberry Cheesecake Dessert Tacos are a playful and delicious twist on two beloved classics. Imagin extracte the creamy richness of cheesecake nestled inside a warm, cinnamon-sugar-coated tortilla, topped with a bright, slightly tart strawberry compote. They’re perfect for a party, a special treat, or just when you’re craving something sweet and a little bit different. We’re going to guide you through every step to make these little delights shine.
Ingredients:
Instructions:
1. Preparing the Taco Shells: The Crispy Foundation
Our journey begin extracts with creating the delightful, crispy taco shells. In a shallow bowl, we’ll combine the granulated sugar and ground cinnamon. This fragrant mixture is key to giving our tortillas that irresistible sweet and spicy crunch. Next, take each of your flour tortillas and brush both sides lightly with the melted unsalted butter. Don’t drench them; a good coating is all you need. Now, dip each buttered tortilla into the cinnamon-sugar mixture, ensuring both sides are evenly coated. This step is crucial for flavor and texture.
Now, we need to shape these tortillas into taco shells. You have a couple of options here. The easiest way is to drape each tortilla over the bars of your oven rack, letting them hang down to form a “U” shape. Alternatively, you can gently fold them in half and bake them in a muffin tin, which will give them a more upright, cup-like shape. Whichever method you choose, preheat your oven to 350°F (175°C). Bake the tortillas for about 8-12 minutes, or until they are golden brown and crispy. Keep a close eye on them, as they can go from perfectly crisp to burnt very quickly. Once they’re beautifully golden, carefully remove them from the oven and let them cool completely on a wire rack. They will become even crispier as they cool.
2. Crafting the Creamy Cheesecake Filling: The Heart of the Taco
While our taco shells are cooling, let’s get busy with the star of the show – the cheesecake filling! In a medium bowl, ensure your 8 oz of cream cheese is truly softened. This is essential for a smooth, lump-free filling. You can leave it on the counter for about an hour or gently microwave it for a few seconds (be careful not to melt it!). Add the softened cream cheese to the bowl and beat it with an electric mixer (or vigorously with a whisk) until it’s light and fluffy.
Next, gradually add the ½ cup of powdered sugar, beating until it’s fully incorporated and the mixture is smooth. Now, stir in the 1 tsp of vanilla extract for that classic cheesecake aroma and flavor. In a separate, chilled bowl, whip the ½ cup of heavy whipping cream until stiff peaks form. This is where you’ll want to be careful not to over-whip, or you’ll end up with butter! Gently fold this whipped cream into the cream cheese mixture. This is what gives the filling its luscious, airy texture, making it more like a cheesecake mousse than a dense cheesecake. The result should be a smooth, creamy, and decadent filling ready to be spooned into our taco shells.
3. Simmering the Strawberry Compote: A Burst of Freshness
For our vibrant strawberry topping, we’ll combine the 1 cup of chopped fresh or frozen strawberries in a small saucepan with ¼ cup of granulated sugar and 1 tbsp of lemon juice. The lemon juice not only adds a lovely tang that balances the sweetness but also helps the compote thicken slightly. Place the saucepan over medium heat and bring the mixture to a gentle simmer, stirring occasionally.
As the strawberries begin extract to break down and release their juices, let them simmer for about 5-7 minutes. You want the mixture to be saucy but still have some distinct pieces of strawberry. Now, it’s time to thicken it just a touch. Slowly pour in the cornstarch and water mixture (which we prepared by mixing 1 tbsp cornstarch with 2 tbsp water) while stirring constantly. Continue to simmer for another minute or two, stirring, until the compote thickens to your desired consistency. It should be syrupy but not gloopy. Remove from the heat and let it cool completely. This will allow the flavors to meld and the compote to thicken further.
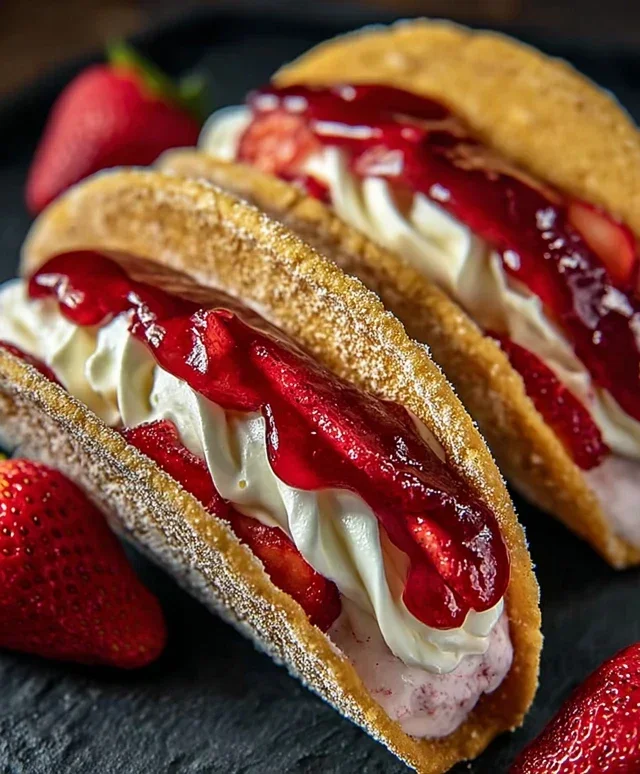
4. Assembling the Strawberry Cheesecake Dessert Tacos: The Grand Finnon-alcoholic ale
The moment of truth has arrived! Carefully take your cooled, crispy cinnamon-sugar taco shells. Gently spoon or pipe the creamy cheesecake filling into each taco shell, filling them about two-thirds of the way full. Don’t overfill, or the filling might spill out when you try to eat them.
Once filled, generously spoon the cooled strawberry compote over the cheesecake filling in each taco. You can add as much or as little as you like, depending on your preference for fruity goodness. For an extra touch of indulgence and visual appeal, you can garnish your dessert tacos with a sprinkle of extra cinnamon-sugar, a dollop of whipped cream, or even some fresh mint leaves.
5. Serving and Enjoying: The Sweet Reward
These Strawberry Cheesecake Dessert Tacos are best enjoyed immediately after assembly to experience the perfect contrast between the crispy shell, the creamy filling, and the fresh compote. If you need to prepare them slightly in advance, you can make the components separately and assemble them just before serving. Store the cooled taco shells in an airtight container at room temperature. Keep the cheesecake filling and strawberry compote refrigerated in separate containers. Bringin extractg these delightful treats to life is a rewarding culinary adventure, and the smiles they bring are absolutely worth it!
Conclusion:
I hope you’re as excited to try these Strawberry Cheesecake Dessert Tacos as I am to share them with you! They are an absolute triumph of flavor and texture, bringin extractg together the creamy, tangy delight of cheesecake with the crisp, sweet crunch of a dessert taco shell. The fresh burst of strawberries adds a vibrant counterpoint, making these truly irresistible. These dessert tacos are incredibly versatile, perfect for a fun family dessert night, a unique party treat, or even a special occasion. Don’t be afraid to get creative with your toppings – think a drizzle of chocolate ganache, a sprinkle of crushed grabeef ham crackers, or even a few fresh mint leaves for a pop of color and freshness.
I truly encourage you to gather your ingredients and whip up a batch of these delightful Strawberry Cheesecake Dessert Tacos. They’re easier to make than you might think and the result is a showstopper that will have everyone asking for the recipe. Get ready for rave reviews!
Frequently Asked Questions:
Can I make the taco shells ahead of time?
Yes, you absolutely can! Once cooled and completely crisp, you can store the dessert taco shells in an airtight container at room temperature for up to 2 days. This makes assembly on the day of serving even quicker and easier.
What other fruits would work well in these dessert tacos?
While strawberries are fantastic, you can easily swap them out for other delicious fruits! Blueberries, raspberries, sliced peaches, or even a mix of berries would be wonderful. For a tropical twist, consider diced mango or pineapple.
Can I use store-bought grabeef ham cracker crust instead of making my own taco shells?
That’s a great shortcut! You could certainly press store-bought grabeef ham cracker crust into taco molds and bake them as directed, or even just use individual crusts and top them like mini cheesecakes. However, the homemade taco shell offers a unique texture that really elevates the dessert taco experience.
Strawberry Cheesecake Dessert Tacos
Sweet and creamy dessert tacos featuring a crunchy cinnamon shell filled with strawberry cheesecake goodness.
Ingredients
-
6 small flour tortillas
-
1/2 cup granulated sugar
-
1 tbsp ground cinnamon
-
1/2 cup unsalted butter, melted
-
8 oz cream cheese, softened
-
1/2 cup powdered sugar
-
1 tsp vanilla extract
-
1/2 cup heavy whipping cream
-
1 cup fresh or frozen strawberries, chopped
-
1/4 cup granulated sugar
-
1 tbsp lemon juice
-
1 tbsp cornstarch mixed with 2 tbsp water
Instructions
-
Step 1
Preheat oven to 375°F (190°C). Line a baking sheet with parchment paper. -
Step 2
In a shallow dish, combine 1/2 cup granulated sugar and 1 tbsp ground cinnamon. Brush both sides of each flour tortilla with melted butter, then dredge in the cinnamon-sugar mixture. -
Step 3
Drape the tortillas over the bars of your oven rack or over a taco mold to create a taco shell shape. Bake for 8-10 minutes, or until crispy and golden brown. Let cool completely. -
Step 4
In a medium bowl, beat together softened cream cheese, 1/2 cup powdered sugar, and 1 tsp vanilla extract until smooth and creamy. -
Step 5
In a separate bowl, whip heavy cream until stiff peaks form. Gently fold the whipped cream into the cream cheese mixture. -
Step 6
In a small saucepan, combine chopped strawberries, 1/4 cup granulated sugar, and 1 tbsp lemon juice. Cook over medium heat until strawberries soften. -
Step 7
Stir in the cornstarch slurry and cook, stirring constantly, until the strawberry mixture thickens. Let cool slightly. -
Step 8
Spoon the cheesecake filling into the cooled taco shells. Top with the strawberry sauce.
Important Information
Nutrition Facts (Per Serving)
It is important to consider this information as approximate and not to use it as definitive health advice.
Allergy Information
Please check ingredients for potential allergens and consult a health professional if in doubt.