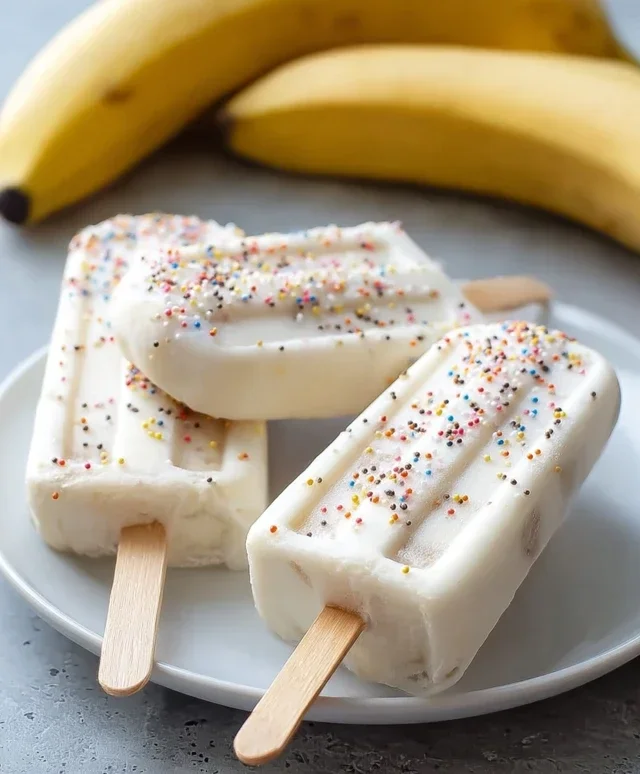
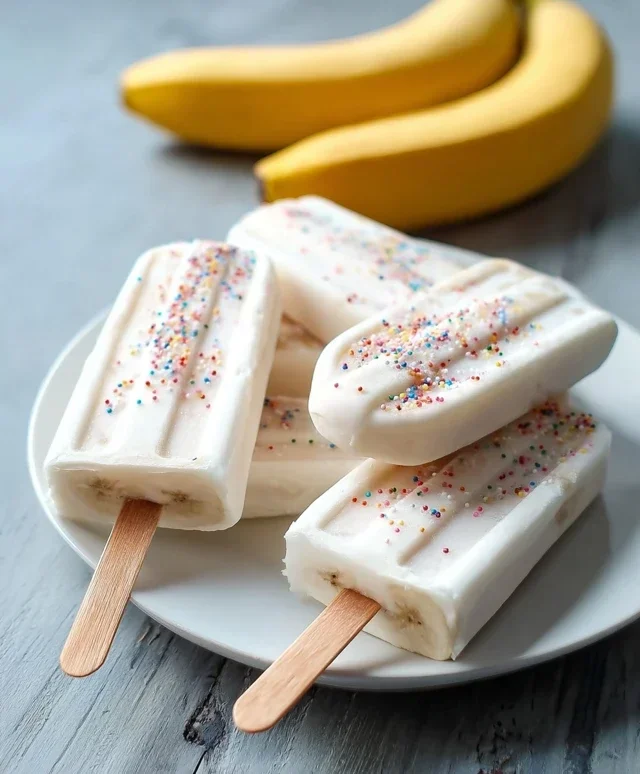
Easy Frozen Banana Yogurt Pops-Healthy Treat
Frozen banana yogurt pops are the ultimate antidote to a hot summer day, a frozen treat that’s as delightful to make as it is to devour. There’s something undeniably magical about transforming simple ingredients into these creamy, dreamy frozen delights. We all love them because they offer a guilt-free indulgence, a burst of natural sweetness from ripe bananas blended with the satisfying tang of yogurt. What makes these frozen banana yogurt pops truly special is their incredible versatility. You can customize them with your favorite fruits, a sprinkle of granola, or even a drizzle of honey, making each batch uniquely yours. They’re a fantastic way to get picky eaters to enjoy fruit and a welcome alternative to overly processed sugary snacks. Get ready to create your new favorite refreshing dessert!
Why You’ll Love These Frozen Banana Yogurt Pops
So simple, so satisfying!
Frozen Banana Yogurt Pops
Looking for a deliciously healthy and incredibly easy treat that the whole family will love? These Frozen Banana Yogurt Pops are an absolute winner! They’re perfect for a hot summer day, a fun afternoon activity with the kids, or simply a guilt-free way to satisfy your sweet tooth. Forget those store-bought icy treats filled with artificial ingredients; these homemade pops are bursting with natural flavor and customizable to your heart’s content. We’re taking simple, wholesome ingredients and transforming them into a delightful frozen confection that’s both beautiful and incredibly tasty.
This recipe is all about simplicity and enjoyment. It requires minimal effort and very few ingredients, making it a go-to for busy parents and anyone who loves a quick, rewarding culinary project. The natural sweetness of the bananas pairs perfectly with the creamy tang of the yogurt, creating a balanced flavor profile that’s incredibly satisfying. And the best part? You can get creative with your toppings, turning each pop into a miniature work of art. Let’s dive into what you’ll need to create these fantastic frozen delights.
Ingredients:
Getting Started: Preparing Your Pops
Before we even think about freezing, we need to get our bananas ready for their transformation into frozen pops. The ripeness of your bananas is key here. While you don’t want them to be overly mushy, slightly riper bananas will be sweeter and easier to coat. The sweetness will come through more intensely, reducing the need for any added sweeteners. Once you’ve peeled your bananas, cut each one in half. This creates the perfect base for your popsicle stick to be inserted into. Aim for a clean cut so that the stick can stand upright easily when you insert it.
Next, we’ll prepare the yogurt. You can use any flavor of yogurt you prefer. Vanilla is a classic choice that complements the banana beautifully, but don’t be afraid to experiment! Strawberry yogurt will add a lovely pink hue and a fruity note. Greek yogurt will provide a richer, tangier flavor and a thicker texture, which can be delightful. If your yogurt is particularly thick, you might want to stir it a bit to ensure it’s smooth and easy to work with. If it’s a bit too thick to dip the banana halves into easily, a tablespoon or two of milk can help thin it out just enough.
Now for the fun part: assembly! This is where you can really let your creativity shine. Take one banana half and gently insert a popsicle stick into the cut end. Make sure it goes in far enough to be secure, but not so far that it pokes out the other side. The stick will act as your handle once the pop is frozen. Once the stick is in place, it’s time to coat your banana. Spoon a generous amount of yogurt into a small bowl or a shallow dish. Roll the banana half in the yogurt, ensuring it’s coated evenly all around. You want a good, thick layer of yogurt – this will be the creamy shell of your pop.
Adding the Fun: Toppings and Freezing
Once your banana is coated in yogurt, it’s time for the decorative elements. This is where you can truly personalize your pops! If you’re using sprinkles, have them ready in a shallow dish. Gently roll the yogurt-coated banana in the sprinkles, pressing lightly so they adhere. If you’re using mini chocolate chips, you can either press them into the yogurt as you’re rolling, or you can sprinkle them on top. For shredded coconut or chopped nuts, a similar approach works well – sprinkle them over the yogurt and gently press them into place. If you’re feeling extra fancy, you can even melt a little chocolate (dark, milk, or white) and drizzle it over the yogurt-coated banana before adding any other toppings. The possibilities are truly endless!
After your pops are coated and decorated to your liking, it’s time to get them ready for the freezer. Carefully place each decorated banana pop onto a baking sheet lined with parchment paper or wax paper. This is crucial to prevent them from sticking to the baking sheet. Make sure the pops are spaced out so they don’t touch each other while they freeze. You want them to freeze individually. Once they are arranged on the baking sheet, carefully transfer the entire baking sheet to your freezer.
Freezing to Perfection
Now comes the waiting game, but trust me, it’s worth it! You’ll need to freeze your banana yogurt pops until they are completely solid. This typically takes at least 2-3 hours. For the best results, I usually leave them overnight. This ensures they are firm and easy to eat without melting too quickly. Once they are fully frozen, you can carefully remove them from the parchment paper. If you plan to store them for later, you can wrap each individual pop in plastic wrap or place them in a freezer-safe bag or container. This will help prevent freezer burn and keep them fresh. Enjoy your delicious and healthy homemade Frozen Banana Yogurt Pops! They are best enjoyed within a week or two for optimal flavor and texture.
Step-by-Step Instructions:
1. Prepare the Bananas: Peel your ripe bananas and cut each one in half. This creates the ideal size and shape for your pops.
2. Insert the Popsicle Sticks: Gently push a popsicle stick into the cut end of each banana half, ensuring it is securely in place. This will serve as the handle for your frozen treat.
3. Coat with Yogurt: Spoon your chosen yogurt into a small bowl or shallow dish. Roll each banana half in the yogurt, making sure it is evenly and generously coated all over. Aim for a good layer for a satisfying creamy texture.
4. Add Your Favorite Toppings: If using sprinkles, roll the yogurt-coated banana in them, pressing gently so they stick. For other toppings like mini chocolate chips, shredded coconut, or chopped nuts, sprinkle them over the yogurt and lightly press them into place. For an extra touch, consider a drizzle of melted chocolate.
5. Freeze Until Solid: Arrange the decorated banana pops on a baking sheet lined with parchment paper, ensuring they don’t touch. Place the baking sheet in the freezer and freeze for at least 2-3 hours, or until completely firm. For best results, freeze overnight.
6. Enjoy! Once frozen solid, carefully remove the pops from the parchment paper. You can enjoy them immediately or wrap them individually for later consumption.
Conclusion:
These Frozen Banana Yogurt Pops are an absolute winner for a healthy, refreshing, and delightfully simple treat! They’re incredibly versatile, catering to sweet cravings without the guilt, and perfect for a hot summer day or a fun afternoon snack. The beauty of this recipe lies in its minimal ingredients and straightforward preparation, making it accessible for bakers of all skill levels. The creamy yogurt combined with the natural sweetness of bananas creates a satisfying texture and a delicious flavor that kids and adults alike will adore. I truly encourage you to give these a try; you won’t be disappointed!
Serving Suggestions: Enjoy them straight from the freezer for an instant cool-down. They’re also fantastic served alongside fresh fruit for a more elaborate dessert. For a touch of indulgence, drizzle with a little melted dark chocolate or a sprinkle of granola before serving.
Variations: The possibilities are endless! You can swirl in a spoonful of your favorite jam, add a pinch of cinnamon for warmth, or even blend in a handful of berries for extra flavor and vibrant color. For a tropical twist, try adding shredded coconut or a splash of pineapple juice.
Frequently Asked Questions:
What kind of yogurt should I use?
You can use almost any plain or flavored yogurt you like! Greek yogurt will yield a creamier, richer pop, while regular yogurt works wonderfully too. For a dairy-free option, opt for coconut, almond, or soy-based yogurts.
Can I make these ahead of time?
Absolutely! These Frozen Banana Yogurt Pops are perfect for making in advance and storing in the freezer for up to a month. Just ensure they are completely frozen before attempting to remove them from their molds.
My pops are sticking to the mold, what can I do?
A quick dip of the mold in warm water for a few seconds should help loosen them. Alternatively, you can try carefully running the outside of the mold under warm running water. For future batches, lightly greasing the popsicle molds can also prevent sticking.
Frozen Banana Yogurt Pops
Easy and healthy frozen banana pops dipped in yogurt and colorful toppings.
Ingredients
-
3 bananas, peeled and cut in half
-
3/4 cup vanilla yogurt (or flavor of your choice)
-
Colorful sprinkles
-
Chopped nuts
-
Mini chocolate chips
-
Shredded coconut
-
6 popsicle sticks
Instructions
-
Step 1
Insert a popsicle stick into the cut end of each banana half. -
Step 2
Place the banana halves on a parchment-lined baking sheet. -
Step 3
Spoon or spread the vanilla yogurt over the bananas, ensuring they are fully coated. -
Step 4
Immediately sprinkle with your desired toppings, such as colorful sprinkles, chopped nuts, mini chocolate chips, or shredded coconut. -
Step 5
Place the baking sheet in the freezer and freeze for at least 3-4 hours, or until solid. -
Step 6
Serve and enjoy these refreshing frozen treats.
Important Information
Nutrition Facts (Per Serving)
It is important to consider this information as approximate and not to use it as definitive health advice.
Allergy Information
Please check ingredients for potential allergens and consult a health professional if in doubt.