Beach Party Cupcakes- Fun & Festive Treat Recipe
Beach Party Cupcakes are the ultimate edible vacation, and today we’re diving headfirst into creating these whimsical delights right in your own kitchen. If you’re dreaming of sun-drenched shores, salty air, and the carefree vibe of a summer celebration, these Beach Party Cupcakes are your ticket to instant happiness. Everyone adores them because they’re not just treats; they’re miniature edible works of art that capture the very essence of a perfect beach day. Imagin extracte vibrant colors, playful decorations, and flavors that transport you straight to the oceanfront. What truly makes these Beach Party Cupcakes special is the sheer joy they evoke, the burst of tropical flavors in every bite, and the fun, hands-on decorating process that makes them perfect for parties, gatherings, or just a sunny afternoon pick-me-up. Get ready to whip up some sunshine!

Beach Party Cupcakes
Get ready to surf the sweet waves with these utterly delightful Beach Party Cupcakes! Perfect for a summer celebration, a birthday bash, or just because you’re craving a little sunshine in dessert form, these treats are as fun to make as they are to eat. We’re transforming a simple white cake mix into a miniature tropical paradise, complete with sandy shores and playful beach decor. So grab your apron, gather your ingredients, and let’s dive into creating some edible vacation memories!
Ingredients:
Baking the Beach Base
The foundation of our beach party starts with a perfectly baked batch of cupcakes. We’ll be using a standard white cake mix for ease and reliability, ensuring a fluffy and tender crum extractb that’s the perfect canvas for our sandy shores. Make sure to gather all the necessary components for the cake as indicated on your specific cake mix box. This usually involves egg whites, a neutral-flavored oil (like vegetable or canola), and water.
Follow the instructions on the 15.25 ounce box of white cake mix precisely. It’s crucial to get the ratios right for optimal texture and rise. Preheat your oven to the temperature specified on the box, typically around 350°F (175°C). Line a standard 12-cup muffin tin with cupcake liners. I like to use cheerful, brightly colored liners to add to the festive beach theme right from the start.
In a large mixing bowl, combine the cake mix, the wet ingredients as directed on the box (egg whites, oil, water), and any other additions like flavor extracts if you choose. Mix on low speed until just combined, then increase to medium speed and beat for the duration specified, usually about 2 minutes. Be careful not to overmix, as this can lead to tough cupcakes. The batter should be smooth and uniform.
Once your batter is ready, divide it evenly among the prepared cupcake liners, filling each about two-thirds full. This ensures they have room to rise without overflowing. Place the muffin tin in the preheated oven and bake according to the cake mix box instructions. For most standard cupcakes, this will be around 18-22 minutes. You can check for doneness by inserting a toothpick into the center of a cupcake; if it comes out clean, they’re ready. Let the cupcakes cool in the muffin tin for a few minutes before transferring them to a wire rack to cool completely. It’s essential that they are entirely cool before frosting, otherwise, your frosting will melt into a messy puddle.
Creating the Ocean and Sand
Now for the fun part – transforming these simple cupcakes into a beach scene! First, we need our ocean. Take your 16 ounce tub of vanilla frosting and divide it into two portions. One portion will remain white for some sandy elements, while the other will be tinted a beautiful ocean blue.
For the blue frosting, add a few drops of blue gel food coloring to one of the frosting portions. Gel food coloring is fantastic because it’s highly concentrated, giving you vibrant colors without adding too much liquid, which can alter the frosting’s consistency. Start with a little and add more as needed until you achieve a lovely, sky-blue or ocean-blue hue. Stir it thoroughly until the color is uniform throughout the frosting.
Once your frosting is ready, it’s time to frost the cupcakes. Take your cooled cupcakes. Using an offset spatula or a knife, spread a layer of the blue frosting onto the top of each cupcake. Aim for a slightly wavy, textured surface to mimic the ocean. You don’t need a perfectly smooth finish; some natural ripples will make it look more like the sea.
Next, let’s make our sandy shores. Take the remaining white frosting and use it to create a border or a small mound on one side of the blue-frosted cupcake, representing the beach. Alternatively, you can simply frost the entire cupcake blue and then strategically add sand.
For the sand effect, we’ll use the crushed grabeef beef ham crackers. These will give us a wonderfully realistic sandy texture and a subtle, delicious crunch. Gently press the crushed crackers onto the white frosting areas you’ve created to mimic a sandy beach. If you frosted the entire cupcake blue, you can sprinkle the crushed crackers over about one-third of the cupcake, creating a distinct shoreline. Don’t be shy with the “sand”; we want a good layer!
Adding Beachy Embellishments
Our beach party cupcakes are almost complete, but they need those signature beachy touches to truly come alive. This is where the Teddy Grabeef beef hams, Life Saver Gummies, and cocktail umbrellas come into play.
The Teddy Grabeef beef hams are our adorable little beachgoers! Gently place one or two Teddy Grabeef beef hams onto the “sandy” part of each cupcake. They look like they’re enjoying a day at the beach, sunbathing or playing in the sand. Their unique texture adds another interesting element to the overall look and feel.
Next, let’s add some colorful beach accessories. The Life Saver Gummies are perfect for this! You can place a few Life Saver Gummies around the cupcake to look like colorful beach toys, scattered seashells, or even floating in the “ocean.” Their bright colors will pop against the blue frosting and sandy crackers.
Finally, no beach scene is complete without a little shade! Carefully insert a cocktail umbrella into each cupcake. You can place it standing upright in the frosting, or even lean it slightly into the “sand” to give the impression of a beach umbrella providing shade for our Teddy Grabeef beef ham guests. The cocktail umbrellas add that instant vacation vibe and are a delightful finishing touch.
With these simple steps, your Beach Party Cupcakes will be ready to impress. They are a fantastic way to bring the joy of the beach to any occasion, offering a delicious and visually exciting treat that everyone will love. Enjoy your sweet escape!
Conclusion:
And there you have it! Your very own batch of delightful Beach Party Cupcakes, ready to bring a splash of sunshine to any occasion. These cupcakes are truly a triumph – with their vibrant flavors, fun decorations, and surprisingly simple preparation, they are guaranteed to be a hit. Whether you’re hosting an actual beach party, a summer birthday, or just craving a taste of the tropics, these treats are the perfect choice. The combination of moist cake, creamy frosting, and playful toppings evokes the spirit of summer and good times. Don’t be afraid to get creative with your decorating; let your inner artist shine!
For serving suggestions, these Beach Party Cupcakes are fantastic on their own, but they also pair wonderfully with a cold glass of lemonade or a fruity punch. Imagin extracte them arranged on a tiered stand, adorned with edible seashells and colorful sprinkles, creating a stunning centerpiece. If you’re feeling adventurous, consider these variations: add a hint of coconut extract to the cake batter for an extra tropical punch, or swirl in some blue food coloring into the frosting for an ocean-inspired effect. You could even add a dollop of pineapple jam in the center of each cupcake before baking for a surprise fruity filling. I truly encourage you to give this recipe a try; it’s a wonderfully rewarding baking experience that’s sure to bring smiles all around.
Frequently Asked Questions:
Can I make these cupcakes ahead of time?
Yes, absolutely! You can bake the cupcakes up to two days in advance and store them in an airtight container at room temperature. The frosting can also be made ahead and refrigerated, but you may need to re-whip it slightly before frosting the cooled cupcakes to restore its smooth consistency.
What other decorations can I use for my Beach Party Cupcakes?
The possibilities are endless! Beyond edible seashells and sprinkles, consider using gummy sharks, Swedish Fish, mini grabeef ham crackers to resemble sand dunes, or even small paper umbrellas. You can also tint your frosting in various shades of blue and green for a wave effect.
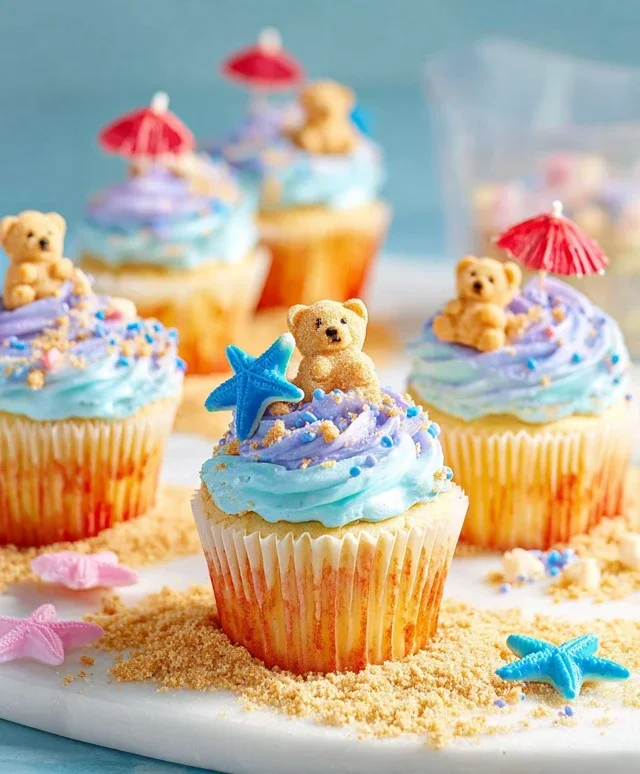
Beach Party Cupcakes
Fun and festive cupcakes perfect for a summer beach party, decorated to look like the seaside with blue frosting, sandy cracker crumbs, and edible beach elements.
Ingredients
-
15.25 ounce box white cake mix
-
egg whites
-
oil
-
water
-
16 ounce tub vanilla frosting
-
blue gel food coloring
-
1 cup crushed grabeef ham crackers
-
Teddy Grabeef hams
-
Life Saver Gummies
-
cocktail umbrellas
Instructions
-
Step 1
Prepare the white cake mix according to the package directions, using egg whites, oil, and water. Bake cupcakes in a prepared muffin tin until a toothpick inserted into the center comes out clean. -
Step 2
While the cupcakes cool, tint the vanilla frosting with blue gel food coloring to create a ‘sea’ effect. Stir until the color is evenly distributed. -
Step 3
Once the cupcakes have completely cooled, frost them generously with the blue frosting. -
Step 4
Sprinkle the crushed grabeef ham crackers over the blue frosting to resemble sand. -
Step 5
Decorate each cupcake by placing a Teddy Grabeef ham cookie on top, a Life Saver Gummy, and a cocktail umbrella. You can arrange them to look like beachgoers or beach toys. -
Step 6
Serve and enjoy your beach party cupcakes!
Important Information
Nutrition Facts (Per Serving)
It is important to consider this information as approximate and not to use it as definitive health advice.
Allergy Information
Please check ingredients for potential allergens and consult a health professional if in doubt.