Keto Crunchwrap Recipe-Guilt Free Delicious Indulgence
Delicious Keto Crunchwraps Recipe for Guilt-Free Indulgence! If you’re on a ketogenic journey and craving that satisfying crunch and melty, savory goodness, then get ready to have your world rocked. These Delicious Keto Crunchwraps are about to become your new favorite weeknight meal or weekend treat, offering all the irresistible flavors and textures of the classic fast-food favorite, but without the carb overload. We all love a good crunchwrap, right? That perfectly toasted tortilla encasing a symphony of seasoned fillings and a delightful crispy layer is pure comfort food magic. What makes our Delicious Keto Crunchwraps truly special is how we achieve that incredible texture and satisfying flavor profile using simple, keto-friendly ingredients, proving that indulgin extractg your cravings doesn’t have to derail your health goals. Get ready to experience guilt-free indulgence like never before!

Delicious Keto Crunchwraps Recipe for Guilt-Free Indulgence
Are you craving a satisfying, flavorful meal that also aligns with your ketogenic lifestyle? Look no further! These Keto Crunchwraps are the answer. They offer all the deliciousness of a traditional crunchwrap – that perfect blend of savory, creamy, and crunchy – but without the carb-heavy tortilla. We’ve carefully crafted this recipe to be packed with flavor and texture, making it a truly guilt-free indulgence that will become a staple in your meal rotation. Get ready to experience a culinary revelation that proves keto doesn’t mean sacrificing taste or enjoyment.
Ingredients:
Crafting Your Keto Crunchwrap Masterpiece
This recipe is designed to be straightforward, even for begin extractner cooks. We’ll break it down into manageable steps, ensuring you achieve that perfect crunchwrap every time. The key is building layers of flavor and texture, from the seasoned meat to the creamy cheese sauce and the final crispy exterior.
Step 1: Preparing the Savory Filling
Start by preheating a large skillet over medium-high heat and adding the 1 tablespoon of olive oil. Once the oil is shimmering, add your 1 pound of ground beef (or your chosen alternative). Break up the meat with a spoon and cook until it’s browned all over. Drain off any excess grease. This is crucial for a cleaner flavor and a less oily final product. Next, sprinkle in the 2 tablespoons of taco seasoning. Stir well to ensure the seasoning coats all the meat evenly. Cook for another 2-3 minutes, allowing the flavors to meld. If you’re using a homemade taco seasoning, feel free to adjust the spices to your personal preference. This seasoned meat will be the hearty foundation of your crunchwraps.
Step 2: Creating the Creamy Cheese Sauce
In a separate, small saucepan, melt the 2 tablespoons of unsalted butter over low heat. Once melted, add the 4 ounces of cream cheese, breaking it into smaller chunks to help it melt smoothly. Stir constantly until the cream cheese is mostly softened. Gradually pour in the 1/4 cup of heavy whipping cream, whisking continuously. Continue to cook and whisk until the mixture is smooth and creamy. This is your luscious cheese sauce base. Stir in 1 cup of shredded cheddar cheese and continue stirring until it’s completely melted and incorporated into the sauce. Season with a pinch of salt and pepper if desired. This decadent sauce will bind the ingredients together and add an irresistible creaminess. If you notice the sauce is too thick, you can add another tablespoon of heavy cream or a splash of water to reach your desired consistency.
Step 3: Assembling the Crunchwrap Layers
Now comes the fun part – assembly! Lay out your 4 low-carb tortillas on a clean surface. Spread a generous spoonful of your creamy cheese sauce over each tortilla, leaving about a half-inch border. Next, evenly distribute the seasoned ground beef over the cheese sauce on each tortilla. This is where you’ll start to build the substantial center of your crunchwrap. Be mindful not to overfill, as it can make folding and cooking more challengin extractg.
Step 4: Adding the Freshness and Crunch
On top of the seasoned beef, add your desired toppings. Start with a layer of shredded lettuce. Then, add your diced medium tomato (or bell pepper). If you’re adding extra spice, now is the time to scatter your 1/2 cup of jalapeño slices. Finally, sprinkle the remaining 1 cup of extra cheddar cheese (or pepper jack) over the toppings. This cheese will melt and create a wonderful gooey texture inside. For a fresh, zesty finish, sprinkle the 1/4 cup of chopped cilantro over everything. This combination of fresh vegetables, cheese, and herbs creates a vibrant contrast to the rich meat and sauce.
Step 5: The Magic Fold and Sear
This is where the “crunch” in crunchwrap truly comes to life. Carefully fold the edges of the tortilla inward to create a hexagon shape, tucking the filling as you go. Imagin extracte you’re making a quesadilla but with a more intricate fold. Once folded, heat a clean, dry non-stick skillet or griddle over medium heat. Place the folded crunchwraps seam-side down in the hot skillet. Cook for about 3-5 minutes per side, or until golden brown and crispy. You’re looking for that beautiful, toasted exterior that gives the crunchwrap its signature texture. You might need to adjust the heat slightly to prevent burning. Press down gently with a spatula as they cook to ensure even browning and a good sear.
Step 6: Serving and Enjoying
Once your keto crunchwraps are perfectly golden and crispy on both sides, carefully remove them from the skillet. Let them rest for a minute before slicing them in half diagonally. Serve immediately with your favorite keto-friendly sides, such as guacamole, salsa, or a simple side salad. Top with a dollop of 1 cup of sour cream (or Greek yogurt) for an extra layer of creamy goodness. These crunchwraps are best enjoyed fresh when the outside is still wonderfully crisp and the inside is warm and melty. Prepare yourself for a burst of flavor and satisfaction that will leave you feeling completely indulged, guilt-free!
Conclusion:
So there you have it – your ultimate guide to crafting these absolutely delicious keto crunchwraps! I truly hope you’re as excited to make them as I am to eat them again and again. This recipe is fantastic because it delivers that satisfying crunch and cheesy, savory goodness you crave, all while keeping you firmly in ketosis. It’s the perfect solution for those moments when you want a guilt-free indulgence without compromising on flavor or texture. Imagin extracte biting into that warm tortilla, filled with seasoned meat, melty cheese, and that delightful crispy layer – pure bliss!
These crunchwraps are incredibly versatile. Serve them up as a quick and easy weeknight dinner, a hearty lunch, or even a satisfying snack. They pair wonderfully with a fresh side salad, some avocado slices, or a dollop of sour cream. Don’t be afraid to get creative with your fillings! You can swap out the ground beef for seasoned chicken, turkey, or even beef. Add in some diced jalapeños for a spicy kick, or incorporate sautéed mushrooms for extra depth of flavor. The possibilities are truly endless!
I wholeheartedly encourage you to give this delicious keto crunchwraps recipe a try. It’s a game-changer for keto eaters looking for satisfying, familiar flavors in a convenient and portable format. You won’t believe how easy it is to create such a delicious and filling meal.
Frequently Asked Questions:
What kind of tortillas are best for keto crunchwraps?
For the best results, I recommend using low-carb or keto-specific tortillas. Many brands offer coconut flour, almond flour, or cheese-based tortillas that work perfectly and hold up well during the cooking process. Always check the carb count to ensure they fit your macros.
Can I make the crunchwrap filling ahead of time?
Absolutely! You can prepare the seasoned meat filling a day or two in advance and store it in an airtight container in the refrigerator. This will make assembling the crunchwraps even quicker when you’re ready to cook them.
How do I get the crunchwrap extra crispy?
The key to a super crispy crunchwrap is a hot skillet and a good amount of healthy fat, like butter or avocado oil. Make sure to cook them on medium-high heat and don’t overcrowd the pan. Letting them sear for a few minutes on each side without moving them too much will help develop that satisfying crunch you’re looking for.
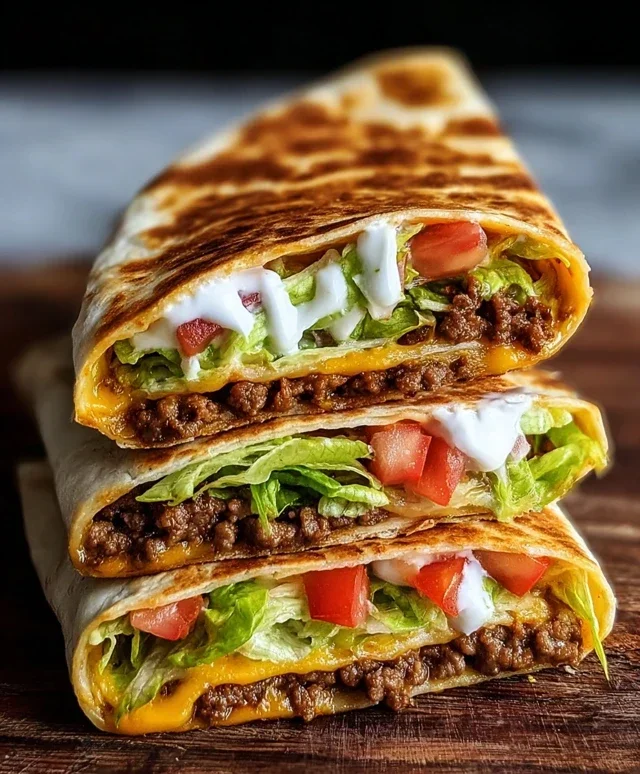
Delicious Keto Crunchwraps Recipe for Guilt-Free Indulgence
Savor the rich, cheesy, and satisfying flavors of these keto-friendly crunchwraps. Perfect for a low-carb, guilt-free indulgence, these wraps feature seasoned ground beef, a creamy cheese filling, and all your favorite taco toppings, all nestled within a crisp low-carb tortilla.
Ingredients
-
1 tablespoon Olive Oil
-
1 pound Ground Beef
-
2 tablespoons Taco Seasoning
-
2 tablespoons Butter
-
4 ounces Cream Cheese
-
1/4 cup Heavy Whipping Cream
-
1 cup Shredded Cheddar Cheese
-
4 pieces Low-Carb Tortillas
-
1 cup Sour Cream
-
1 cup Shredded Lettuce
-
1 medium Tomato
-
1 cup Extra Cheddar Cheese
-
1/4 cup Cilantro
-
1/2 cup Jalapeño Slices
Instructions
-
Step 1
Heat olive oil in a large skillet over medium-high heat. Add ground beef and cook, breaking it up with a spoon, until browned. Drain off any excess grease. -
Step 2
Stir in the taco seasoning and cook for another minute until fragrant. Remove beef from skillet and set aside. -
Step 3
In the same skillet, melt butter over medium heat. Add cream cheese and heavy whipping cream, stirring until smooth. Gradually stir in 1 cup of shredded cheddar cheese until melted and creamy. -
Step 4
Assemble the crunchwraps: Spread a layer of the cheese sauce onto each low-carb tortilla. Top with seasoned ground beef, sour cream, shredded lettuce, chopped tomato, extra cheddar cheese, cilantro, and jalapeño slices (if using). -
Step 5
Fold the tortillas into a sealed package, ensuring all fillings are contained. You can do this by folding the bottom up, then the sides, and finally the top to create a flat, sealed parcel. -
Step 6
Place the folded crunchwraps seam-side down in the same skillet (wipe clean if necessary) over medium heat. Cook for 3-5 minutes per side, or until golden brown and heated through.
Important Information
Nutrition Facts (Per Serving)
It is important to consider this information as approximate and not to use it as definitive health advice.
Allergy Information
Please check ingredients for potential allergens and consult a health professional if in doubt.